Representing the artist that would otherwise not have a voice

Category: Music Technology

Setting Avid ProTools up for Mixing

We thought it would be good to review options for configuring an effective and inspiring mixing environment. We’ll pull together certain techniques that the Pro’s use, consider new ways to utilize some tools, and explore additional Pro Tools features that can significantly enhance the mixing process.

Anyone that has mixed before has seen how beefing up a system can facilitate taking on larger, more complex projects. Nowhere is this more imperative than when mixing. You just can’t get enough of certain items:

  • Control surface features. Mixing is all about making repeated control adjustments until you’ve gotten parameters just right. How do you make these adjustments? Perhaps largely using the graphical editing tools we explored last week, but everything else you do involves setting linear fader levels, rotary pot positions, and other types of controls. Control surfaces make these actions considerably easier, so it won’t be a surprise if you use these features more when mixing that at any other stage of the production process.

  • Screen real estate. With or without a control surface, mixing benefits from as much display capacity as possible. Besides having access to both the Mix and Edit windows, you’ll often want to show multiple plug-ins as well as other windows. Larger monitors are always good, but a second display is even better. 

  • Processing power and RAM. The amount of number crunching going on within a mix can be staggering. Unless you’re making minimal use of signal processing, faster multi-processor or multi-core hosts for native systems—or additional DSP cards with an HD rig—will enable you to manage far more involved mixes. Likewise, additional RAM will boost general performance and enable the use of more plug-ins, particularly processor hogs like convolution reverbs.

  • Plug-ins. Of course, all of this processing power won’t help if you don’t have much in the way of plug-ins. The standard suite of Pro Tools plug-ins is a nice start, but you’ve already seen how additional Avid as well as third-party products can dramatically enhance your capabilities. For mixing, you may want to start by looking at additional ambience and effects processors, since these are not the strongest elements of the basic Pro Tools collection.

Although generally speaking most mixing beginners use systems with a single monitor with and without a basic control surface, you can imagine that display options can be much more dramatic with expanded systems. However, if you are fortunate enough to have two monitors and do not have a control surface, you’ll likely want to dedicate one monitor for the Mix window and the other for the Edit window.  If you prefer to do most of your work using the Edit window, you might toggle between Edit and Mix on your main monitor and reserve the second for plug-ins as well as other frequently used windows (Memory Locations, Automation, etc.). With two monitors and a control surface, there’s rarely any reason to access the Mix window. Maximize the Edit window on the main monitor, and use the second as described above.

When using a single monitor, how can you optimize the display? Consider these options for the Edit window:

  • View the left (tracks/groups) column. Though you can use Groups List Keyboard Focus mode (introduced in the next topic) to enable and disable groups, you’ll miss some nice features without access to the Groups List.

  • Hide the Clips List. Yes, there are commands in the Clips List popup menu you might need when mixing, but some have shortcut equivalents, and much of the time these are not necessary.

  • Select inserts, sends, and I/O view options. The I/O column allows you to bring up Output windows and use quick shortcuts to access automation playlists, so this is a good option when you’re mixing primarily with the Edit window.

  • Show the Automation and Memory Location windows. These may be accessed frequently, so consider dedicating a typical area for them.

  • Hide the Transport window. At this stage, it just gets in the way, and you can display transport controls in the main Edit window toolbar and/or set the numeric keypad to Transport Mode for control of everything you need.

  • View one plug-in at a time. Though it can be really convenient to have more than one plug-in window on screen, they will quickly obscure the rest of the session. Alternatively, use the commands introduced below to facilitate working with multiple floating windows.

Your base display might look like this:

However, it is sometimes very useful to include multiple floating windows in your screen layout. For example, you might want to display several plug-in windows in order to compare EQ settings on various channels, or utilize a series of output windows to provide mixer-like functionality while maintaining the basic Edit window perspective. Some users don’t bother with such configurations, since it takes a bit of effort to open and close all of the windows. However, there are a couple of newer Pro Tools features that greatly facilitate these scenarios:

  • Hide floating windows. The command Window > Hide All Floating Windows makes it much easier to utilize multiple windows. Rather than closing and reopening floating windows manually—a minor but annoying hassle—you can simply hide them temporarily. You can also use the shortcut Command-Option-Control+W (Mac OS) or Control-Alt-Start+W (Windows).

  • Create custom Window Configurations. A handy part of the Pro Tools feature set is the ability to name, store, and recall the configuration of windows in a session as well as the view options of the primary windows.

Color coding is the type of feature that might seem trivial at first glance. However, it can really enhance the usability of sessions by providing an additional dimension of feedback that helps you differentiate repeated elements with similar features.

Three aspects of the Edit and Mix window displays can be customized with color coding preferences:

  • Color bars that appear in several locations

    • above and below each channel strip in the Mix window.

    • to the left of each track in the Edit window track area.

    • to the left of each track name in the Tracks List.

    • to the left of each group name in the Groups List.

  • Track area display in the Edit window

    • clip shading in Blocks or Waveform views.

    • waveform color when viewing automation playlists.

  • Shading between markers in the Markers ruler.

Note that of these options only the Track Color view affects the Mix window display.

Color coding selections are made in the Display preferences tab. Track Color Coding settings apply to all color bars, and Clip Color Coding settings determine clip and waveform shading. Marker ruler colors are enabled via the first checkbox, or when choosing the Marker Locations option for clips.

How important is the brightness and contrast of the Pro Tools interface? Perhaps more than you’d think. Consider the dramatic changes made to the graphical user interface way back when version 8 was released:

A session opened in Pro Tools 7.4

The same session as of Pro Tools 8.

The difference is not subtle. If you’re like most people, you either love the updated interface… or can’t stand it! At that time, many who preferred the “classic” version liked the bright display and contrast that could make it easier to differentiate on-screen elements. Some who preferred the revised version found it more comfortable for viewing, especially during long sessions.

What do you think? Regardless, there are additional display options that allow you to modify the standard grey background if you find it unappealing. The Color Palette window can be used to customize interface colors, and in particular alter the shading of channel strips.

The Brightness slider can make a big difference for background contrast. You also might want to experiment with the Apply to Channel Strip button shown above, along with the Saturation slider, to shade channel backgrounds according to the active color coding preference.

If you’re consistently well organized, carefully manage your assets from the very first tracks and clips in a session onwards, and follow recommended procedures for recording, overdubbing, and editing, you can skip this section. On second thought, even the most rigorous and diligent engineers should still read on. This is a good time to review various ways to prepare a session for mixing, and there’s a good chance you haven’t tended to at least a couple. Furthermore, you may inherit a project from another engineer and find yourself forced to deal with someone’s mess, or get a gig remixing an existing record. Despite your best intentions, you nonetheless may need to deal with the following elements of a session prior to mixing:

  • Rename tracks. Don’t be surprised when you’re hired to mix a session and track names are obscure and unrecognizable. Restrict names to 8 characters or fewer so that certain control surface LED scribble strips won’t truncate them.

  • Add markers. The complete song form should be clearly and precisely outlined so that every major transition is easily located. This will also facilitate selecting sections of a song in order to create snapshot automation.

  • Create selection presets. It’s also handy to define preset selections for frequently accessed sections of a song.

  • Construct a beat map. Even if you didn’t do this for editing, a beat map can also come in handy when mixing for techniques such as synchronizing plug-ins with the performance.

  • Create display presets. Memory locations can also be used to store detailed display configurations with customized track show/hide status, height, group enables, zoom settings, and window configurations. For example, you might have a setup for submixing background vocals that includes displaying certain tracks with specific heights and zoom settings. Such presets generally should not have time properties designated. 

  • Define groups. This is a powerful feature that facilitates linking controls on related tracks. We’ll address it in detail in the next topic.


  • Clean up. The track area in particular can get increasingly messier as a production progresses, and is often at its worst when mixing commences. We’ll discuss how to approach such problems on the next page.

  • Print Instrument tracks. You’ll probably need as much processing power as possible for plug-ins when mixing. Virtual instruments typically demand an inordinate percentage of available resources, so you should consider bouncing them to Audio tracks. 

In theory, your tracks and edits will be clean as a whistle when it’s time to mix. In reality, that’s not always the case. Although you’ve presumably sliced and diced the playlists already, some rough edges may remain. Try to address the following prior to mixing:

  • Trim tops and tails. Although it’s possible to keep your clips intact and automate mutes in order to control where they begin and end, it’s a much better idea to trim back clips. You’ll save processing power for more important tasks, and there’s no risk of inaccurate automation timing.

  • Clear other excess. Similarly, you should delete unwanted audio within larger clips. Done properly, your playlists will contain concise clips where tracks play, and will be clear elsewhere.

  • Add fade-ins and -outs. If you trimmed clips as close as possible to the desired audio, it’s possible you’ll need a short fade to smooth the transition. You might want to trim up the entire session and then apply batch fades to make this quick and easy.

  • Check existing edits. It’s possible that some of your crossfades did not end up as clean as you’d like. Verify the integrity of these, or go through a single batch process as above.

  • Consolidate. We discussed consolidating audio two weeks ago, but you sometimes won’t do this until ready to mix. Since consolidating combines all of your edits into a single clip, you may prefer to wait until you’re certain that no further changes will be needed. Consolidation can be useful prior to mixing to reduce the disk access load in sessions with high track counts and edit density. 

When mixing, you’ll often need to make an identical adjustment on multiple tracks simultaneously. Perhaps you want to raise all of the guitar tracks—whether you have 2 or 20—by 3 dB. Or mute the entire drum kit for two beats. Or trim the tails of a set of background vocals. Or… well, do almost anything you’d do on a single track.

There are two ways to approach these scenarios that don’t involve painstakingly making the exact same moves on each track. Grouping can make your work much easier in all phases of the production process, but especially when mixing.

We’ll look at a variety of considerations pertaining to implementing and using Pro Tools grouping features, including significant new features, enhancements, and changes introduced in recent versions. Complete the reading below before continuing.

General Characteristics of Groups

Fundamentally, grouping seems like a simple enough concept. However, a closer look will reveal some fairly sophisticated and versatile capabilities. We’ll start by identifying the general characteristics of Pro Tools grouping features before exploring how they work in your sessions:

  • Recent versions do more. Grouping in older Pro Tools versions was a useful but basic feature. It’s now both useful and extremely powerful. Noteworthy enhancements include:

    • more groups (104, in 4 banks of 26)

    • enhanced Create Group dialog with additional options

      As of version 12 the Create Group dialog supports both global as well as individual group attributes.

    • no need to select tracks prior to invoking the New Group command

    • no longer necessary to overwrite existing groups to modify their specifications

    • revised Groups List popup menu

    • ability to specify which controls are grouped

  • Basic grouping and VCA-style grouping are different. When using the functions discussed in this topic, a control change on a grouped control on any track results in the same change to all group members. There’s another option—VCA-style grouping—in which multiple tracks can be controlled by a remote master, but the controls on the individual channels only affect a single track. (Requires either Pro Tools HD or version 12 or higher software.)

  • Fader (or other control) levels on grouped tracks maintain the same relative positions when adjusted. For example, if you raise a fader on one group member such that others top out, the relative positions are restored when you lower the levels.

  • Groups can be specified for edit functions, mix controls, or both. An Edit group only affects specific edit functions:
    • track view
    • track height

    • track timebase

    • editing functions such as selecting or trimming multiple tracks

    • automation functions such as inserting or modifying data on multiple tracks

 Mix groups can include fader, mute, and other controls (many more with Pro Tools HD). Edit groups do not include these controls, even when utilizing Edit window channel controls.
  • Groups can also be nested. You can define and use multiple groups with overlapping members. The Group ID for any channel appearing in two or more active groups is displayed in upper case.

Here, we’ll quickly review the steps required to create a Group in ProTools.

  1. Use any of the following methods to access the Create Group dialog:

    1. Invoke the command from the Track menu.


    2. Invoke the command from the Mix Groups list or Edit Groups list popup menu.


    3. Use the shortcut Command+G (Mac OS) or Control+G (Windows)


      NOTE: With previous versions of Pro Tools, it was necessary to select all tracks to be grouped prior to invoking the New Group command. This is (conveniently) no longer the case.

  1. Enter an appropriate name and select an ID.

    NOTE: You don’t have to stick with the default consecutive IDs for your groups. It can be helpful to use letters that relate to the group members (d for drums, for example), or come up with a standard configuration you’ll remember in all of your sessions. By doing so, you can facilitate enabling and disabling groups using Groups List Keyboard Focus (described below).

  2. Select the group type. If you’re not sure whether you’ll need the group for edit or mix functions, select both types; you can always modify this later.

  3. Select the attributes that will be linked on Mix group tracks (in addition to the fader level and automation status, which are always linked).

     NOTE: In version 12 and higher, you can also assign the group to an available VCA Master track.
  4. Select the tracks that will be members of the group, using one or more of the following methods: 

    1. To add selected tracks to the group member list, click on Add.

    2. To add selected tracks to the group member list in place of any members currently in the list, click on Replace.

    3. To add tracks from the Available tracks list, select one or more in the list, then click on Add >>.

    NOTE: Press A on the keyboard to add tracks selected in the Available list.
6. Click ok

It’s not uncommon for you to want to modify characteristics of a group. For example, you might record new tracks that are consistent with an existing group, or find that you’d rather not have an Edit group also link track controls. In the past, you’d have to create a new group and overwrite the previous one to effectively modify it. That’s not necessary anymore:

  1. Access the Modify Groups dialog using any of the following methods:

    1. Select Modify Groups in the Edit Groups List or Mix Groups List popup menu.

    2. In the Mix window, click on a track’s Group ID Indicator and select Modify in the popup menu.

    3. Right-click or click and hold on the group name in the Edit Groups List or Mix Groups List, then select Modify in the popup menu. 

  2. Set the group parameters as you would when creating a new group, starting with the group ID.

    1. The Remove button in the Modify Groups dialog provides an easy means for removing one or more tracks from the current group members.

    2. The handy—but dangerous—All group (discussed shortly) can be modified to make it somewhat less dangerous by restricting it to only act as an Edit or Mix group.

Two of the methods for modifying groups also provide a means for deleting a designated group:

  1. In the Mix window, click on a track’s Group ID Indicator and select Delete in the popup menu.

  2. Right-click or click and hold on the group name in the Edit Groups List or Mix Groups List, then select Delete in the popup menu.

You can also delete all currently active groups with the aptly named Delete Active Groups command in the Edit Groups List or Mix Groups List popup.

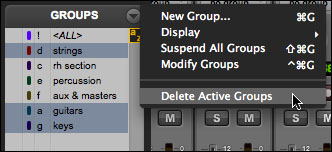
NOTE: Deleting groups is not undoable, so be certain you really want to do this. Don’t worry; you’ll be reminded. Also keep in mind that deleting groups leaves the actual tracks intact.

Don’t discount the possibility that a grouped pair of mono tracks might occasionally be more effective than the typical stereo configuration. It’s true that a single stereo track is usually best for two-channel sources such as virtual instruments or stereo miking. However, you’ll sometimes want to treat one side of the pair differently than the other, like using a different plug-in on the left and right channels. In this case, it might be convenient to simply work with mono tracks but group them to easily adjust their general control settings.

In this section, we’ll explore a variety of aspects related to using channel inserts in Pro Tools sessions. We’ll start by considering several general insert issues, including the potential for misusing plug-ins, insert signal flow in applicable tracks, and the distinctions between multi-mono and multi-channel formats. We’ll review basic methods for instantiating inserts, and throw in a few new tricks for simultaneously adding or deleting multiple inserts, as well as moving and copying them. We’ll look at several options for organizing plug-in menu listings, including basic preferences, custom plug-in favorites, and default EQ and compressor settings. We’ll identify the performance issues relevant to heavy use of plug-ins, and suggest appropriate settings for optimizing plug-in capabilities in mix sessions. We’ll revisit the concept of plug-in latency discussed earlier this week, and see how to mitigate the potential problems of phase cancellation. Finally, we’ll survey a variety of specific techniques that will be helpful when utilizing inserts. Complete the reading below, and then we’ll get started.

Inserts and real-time plug-ins are not equivalent. It’s easy to think of these as identical, since all real-time plug-ins are instantiated as channel inserts. However, hardware I/O channels can also be utilized for inserts, and this has nothing to do with internal signal processing. We’ll be dealing with plug-ins almost exclusively here and will use the terms somewhat interchangeably, but keep in mind that there is an alternative.

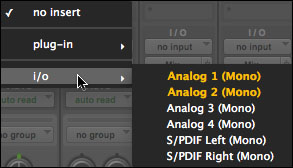
Scroll past the plug-in submenu when instantiating an insert to access another submenu with hardware I/O options.


If your audio interface only supports two inputs and outputs, it won’t be possible to use hardware inserts. (You’d need at least one unused input and output channel, and the main stereo monitor outputs would preempt any others.) 

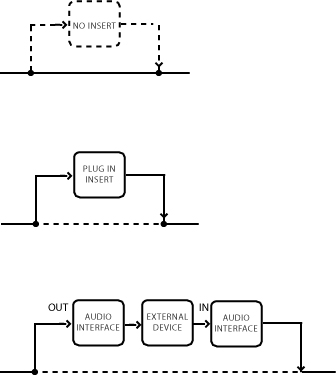
When a plug-in is inserted in a channel, it interrupts the normal signal flow and routes audio through the plug-in software. When an I/O channel is inserted in the signal flow, audio is routed to the designated audio interface output channel, through an external device, and back through the corresponding audio interface input channel.

Messing around with signal processing can be one of the most enjoyable aspects of production. But beware: just like with anything else, too much of a good thing can quickly cease being so good. Novice engineers often fall into one or more of these classic traps: 

  • Overprocessing. It often seems like it’s easier to crank up the controls of an on-screen device as opposed to actual hardware. There’s something about turning a pot all the way up that breeds caution more than clicking and dragging.

  • Too many plug-ins. There’s rarely a good reason to use three, four, or even five inserts across the board. Nonetheless, some engineers appear to believe that more is better. It’s not.

  • Poor gain staging. In theory plug-ins can be overloaded, and unlike classic analog gear they won’t sound good when doing so. Fortunately, the 32-bit floating point processing used by AAX plug-ins provides essentially unlimited headroom, so this is no longer a critical issue. Still, I’d pay attention to gain staging—at some point, even if only with regards to hardware inputs and outputs, you’ll have to stay within proper operating limits.

The channel signal flow for Audio and other track types is not complex compared to traditional consoles, but you still need to be aware of how it works. In Audio, Auxiliary, and Instrument tracks, inserts are always pre-fader and appear in series beginning with Insert A. Keep in mind the order of insert slots when setting up signal processing. If, for example, you want your EQ to follow a compressor, you don’t want it placed in the first slot. 

Five inserts are shown here, but all Pro Tools audio-based tracks provide a second bank with five more.

Once instantiated, insert order can usually—but not always—be changed. If you invoke a plug-in with, say, a mono input and stereo output, it cannot be placed ahead of a plug-in with a mono input.

You’ve probably noticed the options of both of multi-mono and multi-channel formats when instantiating plug-ins on stereo tracks. What’s the difference?

  • Multi-mono plug-ins are linked pairs (or larger configurations with surround mixing) of independent processors. The controls can also be unlinked to provide independent adjustment of each channel.

  • Multi-channel plug-ins act like single processors regardless of their input and output configuration. Often, the processing itself is linked. For example, reverb effects may be based on a complex combination of both input channels, and multi-channel dynamics tools generally link gain reduction in both channels to be triggered by an input on either. 

You’re already familiar with how to instantiate a plug-in insert using the ten Insert Selector buttons on each track in the Mix and Edit windows. We’ve also demonstrated how the Plug-in and Insert Position Selector buttons in plug-in windows can be used for these purposes.

Within a channel, just click on the plug-in Insert selector for the desired slot.

Within a plug-in window, first select the insert slot.

Then instantiate a plug-in.

The same controls are used to remove instantiated plug-ins.

no insert

These methods can be extended to instantiate or remove multiple plug-ins simultaneously:

  1. To instantiate or remove the same plug-in on every visible track, press and hold the Option key (Mac OS) or Alt key (Windows) while instantiating (or removing) a plug-in.

    NOTE: Why doesn’t this technique apply to the second channel? It’s a stereo track, and only plug-ins with the same format will be affected. Note that you can use the Plug-in Selector on any track to both instantiate and remove.

  1. To instantiate or remove the same plug-in on every selected track, press and hold Option-Shift (Mac OS) or Alt-Shift (Windows) while instantiating (or removing) a plug-in.

  2. To move an insert to a different position, click and drag the insert to the desired slot. You can move an insert to a different slot on the same channel or to a different channel, but the format must match. If you drag the insert to a slot that already contains one, it is replaced.

  3. To copy a plug-in to a different slot, press and hold the Option key (Mac OS) or Alt key (Windows) while dragging the plug-in to that slot. The duplicate plug-in will have identical settings as well as any applicable plug-in automation.

As you build up your plug-in collection, the process of instantiating can get awkward. Popup menus become unwieldy when the number of items is lengthy, and it’s easy to miss your target when scrolling through multiple submenus. Fortunately, there are a few simple Pro Tools features that can improve the process:

  1. Menu Organization. You can set the preference that determines how the plug-in menu is organized to best suit your needs.

    Menu Organization

    The Flat List is not going to help matters much unless you absolutely despise popup submenus:

    With the Flat List display, the popup length may exceed your screen height!

    Organizing by Category is the default option:

    Organizing by Manufacturer might work for you, but in many cases you’ll end up with a submenu imbalance that won’t make the process any easier:

    Note that the Avid submenu includes Melodyne and Reason, since the plug-in itself is just the ReWire link to external software.

    The Category and Manufacturer option simply provides both organization systems, which presumably is useful under certain circumstances…

  2. Plug-in favorites. If the plug-in menu organization preferences leave you wanting easier options, fear not—there are two other handy features. You can add your most frequently used selections to the root level of the plug-in submenu by pressing and holding the Command key (Mac OS) or Control key (Windows) while selecting the desired favorite.

  3. Default EQ and Dynamics. Even more convenient is the option to place default EQ and dynamic plug-ins as the first two choices in the root level of the insert popup menu, making them incredibly easy to instantiate. Set the default choices in the Mixing preferences tab.

    You can choose any installed EQ and dynamics plug-ins for default choices.

    Default processors are always the first selections in the insert pop-up menu.

Many of the issues we considered for recording are also applicable to the mixing process:

  • Optimize the host computer’s operating system, and disable unnecessary features.

  • Refrain from running other applications in the background, unless they are related to your project (i.e. external VIs such as Reason).

  • Prior to Pro Tools 11, set the Pro Tools CPU Usage Limit as high as possible, while allowing sufficient resources for basic OS tasks such as screen redraws as well as necessary background applications. (Accessed via the Playback Engine dialog.)

However, certain settings that are appropriate for recording must be approached differently for mixing:
  • Host Processors. Prior to Pro Tools 11, with multiprocessor and multi-core hosts you can dedicate some or all of the additional CPU power to real-time plug-ins. This is not necessary when recording, since you’ll generally want to minimize plug-in use to avoid monitoring latency. Mixing is an entirely different story. Try to reserve as much processing power for native plug-ins as is feasible without sacrificing OS performance or automation accuracy. Typically, you’ll reserve at least one processor for system functions, but individual scenarios may vary.

  • Hardware Buffer. You also learned that a small Hardware Buffer size helps minimize monitoring latency. But a larger buffer becomes essential as signal processing demands increase, so when mixing you’ll want it set as high as possible. Since there’s a possibility of inconsistent automation and MIDI timing at higher settings, you should experiment with your system to identify the optimal mix configuration.

    The Pro Tools 10 Playback Engine dialog. Note that Hardware Buffer and RTAS Processor options vary based on your host computer and Pro Tools hardware.

    The version 12 Playback Engine dialog.

    Consider displaying the System Usage window to get an idea of how much CPU power is being used:

    Session with 25 EQ plug-ins

    Session with 25 EQ and 25 compressor plug-ins

    Session with 25 EQ, 25 compressor, and 25 reverb plug-ins

    At some point, the CPU might not be able to handle excessive signal processing. If the buffer size is already maxed out, the only solution is to reduce the number of plug-ins (assuming we’re fond of the tracks and can’t afford a new computer!).

Also note that bypassed plug-ins use as much CPU power as when processing signals. If you have no immediate use for certain plug-ins but don’t want to remove them from a session, it’s better to deactivate rather than bypass. (Control settings and automation you may utilize later are preserved.) Command-Control-click (Mac OS) or Control-Start-click (Windows) on a plug-in (or hardware) insert to deactivate or reactivate it.

First, how can you tell if the processing on a channel is causing latency? Phase cancellation might not be apparent if the volume level is low, so it’s a good idea to check the channel status directly. To do this in Pro Tools 10, just Command-click (Mac OS) or Control-click (Windows) on the Audio Volume indicator below any fader in the Mix window to cycle through its three displays (fader level, peak track level, and total track latency). If using version 11 or later, the Audio Volume indicator is the left display below the fader, and you can toggle between fader level and latency.

Track latency can also be viewed when delay compensation (discussed below) is active by selecting the Delay Compensation option in the Mix Window View.

Total track latency displayed in Pro Tools 10.

Latency displayed in Pro Tools 12.

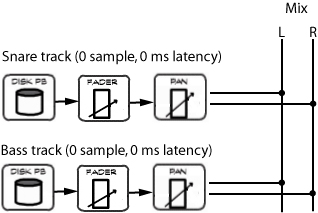
Latency is measured in samples, so in the example above the delay will be approximately 1.5 milliseconds assuming a sample rate of 44.1 kHz (64 ÷ 44,100). Depending upon the plug-ins being used, latency can be significant. In the next example, we’ll activate multiple inserts on a channel. Of the five inserts, all but the first introduce latency. Note how the total latency increases as we activate the plug-ins one-by-one.

Fortunately, this is readily mitigated. Although there are a few methods for dealing with latency, the easiest is to utilize Automatic Delay Compensation. ADC does all of the work for you, adjusting every track’s total delay as needed and updating these settings whenever plug-in instances are modified. It also compensates for the delays associated with busses and sends. It’s theoretically possible you’ll still need to use manual adjustments on occasion, since there’s a limit to the total delay compensation available. However, this will rarely—if ever—be the case, so delay compensation will usually be quick and easy. Here’s how it works:

If you want to use an old-school solution for latency, the following should be a workable solution:

  1. Identify the channels that may need intervention, based on the scenarios we’ve discussed.

  2. Identify the total latency on each channel, and note which channel has the highest latency.

  3. Instantiate the TimeAdjuster plug-in on each affected channel other than the channel with the maximum latency. (Use the small, medium, or long depending upon the amount of correction needed.)

  4. Set the TimeAdjuster delay on each channel so that the total latency matches the delay on the channel with the maximum latency.

  5. Don’t forget to update the TimeAdjuster plug-in settings if you make a change in plug-in usage that alters the latency on the affected tracks.

This may sound like a hassle, and in fact it’s not the most enjoyable part of mixing. But you shouldn’t have too many instances that require intervention, so won’t need to spend a lot of time dealing with latency. Here’s the basic process in the same session:

Command-Option-click (Mac OS) or Control-Alt-click (Windows) on any level display to toggle to the delay time for all tracks. After we add the first adjustment, we can Option-click and drag (Mac; Alt using Windows) on the plug-in nameplate to duplicate it on another track.

Note that the above example was made using Pro Tools 10; the process should be equivalent in version 11, but the TimeAdjuster plug-in doesn’t seem to affect the latency indicator!

Music Industry Will Hit $41 Billion By 2030

A Goldman Sachs analyst forecasted that streaming will account for $34 billion of the total revenues.

The global recorded music industry will grow into a nearly $41 billion behemoth by 2030, thanks largely to the growth of streaming, according to Goldman Sachs analyst Lisa Yang and her team.

The Goldman Sachs analyst further predicts that streaming will account for $34 billion of that, of which $28 billion will come from paid subscription while $6 billion will come from ad-supported streaming services. She predicts that another $4 billon will come from performance rights, synchronization will be $500 million, physical and downloads $700 million and other come in at $1.2 billion.

The report further states that thanks to the explosion of streaming, the Universal Music Group and Sony Music Entertainment should carry hefty valuations. Both companies are themselves not listed in the stock market, but the shares of their parents, respectively Vivendi and Sony. Corp., are publicly traded.

Looking at the Universal Music Group, Yang assigns a valuation of 19.5 billion euros, which according to the OandA website, converts to $23.3 billion; while she says that her estimates for Sony Music Entertainment’s performance suggests a valuation of 2.16 trillion yen or $19.8 billion.

Looking at UMG, Yang breaks out her estimates for that company, which helped derive its valuation. In the Goldman Sachs report, she estimates UMG’s revenue at 12.6 billion euros  ($15.05 billion) by 2030 (that’s twice its current level), of which 1.58 billion euros ($1.89 billion) will be from publishing; 9.3 billion euros ($11.11 billion) from streaming; 1.1 billion euros $1.3 billion) from artist services and music licensing; 500 million euros ($597 million) from merchandising and 150 million euros ($179.2 million) from physical and download sales.

In 2016, U.S. recorded music sales were up by double digits for the first time in nearly 20 years to 11.4 percent with $7.65 billion in revenue, according to the RIAA. That was up from $6.87 million in 2015. Although the music business showed signs of a recovery at the half-year mark, the 2016 year-end results show more significant growth, led by streaming revenue. This was the first time since 1998 that the U.S industry experienced a double digit increase in overall revenue.

6 Steps to Streaming Success on Spotify

Whether you like it or not, there’s no denying that the music streaming industry is continuing to grow at a rapid pace. With Spotify recently hitting a new milestone of 30 million subscribers, we think it’s a wise decision for all independent artists and labels to strengthen their presence on the service.

To help, we’ve compiled these six super easy action items that we’re confident will make a difference in your success on Spotify. Try them out!

1. “On air, on Spotify”

If your music is “on air” – meaning on the radio, YouTube, SoundCloud, or anywhere else online — it should be available to stream on Spotify. This way, you’re both monetizing your music and encouraging playlist adds and profile follows for continued listening.

2. Verify your profile

By verifying your profile (similarly to Twitter), you have the ability to directly communicate with your fans and be highlighted with Spotify’s check of approval. These profiles not only show off an artist’s discography but also house your tour dates, merchandise, biography, photos, and allow you to toggle over to view your playlists on your user profile. A verified profile allows you to communicate with your fans within Spotify through the Spotify Social and Discover feeds, and in-­client messaging. Every time a new piece of content is released ­(new single, EP, album), your fans get a push notification, and every time you add tracks to your playlist, all followers of that playlist will get notified.

To sign up for a verified page, simply fill out the Spotify Verification Request form.

3. Use Spotify as a promotional channel

Think of Spotify as a social network that allows you to monetize your own content in a creative, promotional way. On Spotify, you can gain a follower base, which in turn becomes a promotional channel­. Your Spotify followers receive notifications about updates to your content and your listening habits. Sharing your Spotify profile across your artist properties and socials will drive fans to follow you on Spotify, and allow you to engage in conversations with your fans.

Here are some practical ways to grow your Spotify followers:

  • Follow artists you like to help your fans discover the music you’re listening to.
  • Create and share your playlists.
  • Share across external social networks and encourage conversation when sharing (i.e. ask your fans which tracks they’re into).
  • Share single tracks and albums you’re listening to, and ask fans which playlists you should follow.
  • Add Spotify links to YouTube and other video descriptions.
  • Add the Spotify Follow Button to your website to allow fans to follow you in an easy single click without leaving your website.

4. Create quality playlists

Similar to how a DJ would curate a mix for a radio station or club, streaming services use playlists as an easy way to share tracks and promote discovery.

Keep these tips in mind when creating your playlists:

  • Ensure your account is never empty, and that you have at ­least 1­2 public playlists available.
  • Focus on one playlist –­ choose one to maintain, and add to consistently.
  • Adding tracks on a regular basis is key. The more frequent the adds and the bigger the playlist, the better. Each time you update your playlist, it will appear in fans’ Discover feeds, and followers of the playlist will be notified.
  • Share it. Actively clicking “share” ensures you reach your fans. You’ll find the “share” button towards the top of each page, or right click (cmd+click on Mac) any title to copy and paste the link to be shared across other social platforms.
  • Share with messages: Include text when you share to help your story stand out.
  • Listen to music from your Spotify account. You’ll appear in the live ticker feed (on the right side of the Spotify client), and you’ll generate stories through Discover.
  • Add themed playlists. Once you’ve grown one playlist, add more niche, smaller playlists around certain events or themes.

5. Put the Spotify Play Button on your website

Spotify provides a quick and easy embeddable code that you can put on your website so that your fans can listen to your playlists and discography. By putting this Spotify Play Button on your website or Tumblr, your fans can listen to your music while continuing to engage with your site.

To get the button: just right click on the playlist, track or album on Spotify and select “Copy Embed Code.” This copies the link to your clipboard. Then, paste the code into your website and the Spotify Play Button will show up on your site.

6. Track your metrics

Next Big Sound provides free up-to-date analytics for artists. When you log in, you can see your growth in followers, streaming data, and the effects of your social media campaigns. You’ll be able to track how all of these best practices grows your streams and revenue.

Apply to see your Spotify data here, and read this overview for a full breakdown of how to use Next Big Sound.

About the Foundation for Musicians and Songwriters

The Foundation for Musicians and Songwriters is an IRS 501c3 Public Charity that is dedicated to helping Musicians and Songwriters develop their careers in the Music Industry.  We do so without taking a penny or rights from the artist we represent.

To Subscribe to our Music News Updates, Click Here

Click to Subscribe to our Newsletter

Top-10 Tips to get a Professional Sounding Mix

In today’s tech world, everyone that has a computer is expected to produce expert quality projects.  This is somewhat easy when one needs to create a PowerPoint presentation or a Word Document, but it is not so easy when the final product requires unique skills.

It takes years to get to the point to create studio quality albums, but there are key areas to focus on that can make a night and day difference in the sound quality of the final output.  I put together a top-10 list that can help get you thinking like a Music Engineer/Producer:

1. Check the session over before you start

Make sure you have all the parts, esp. if mixing for someone else. You would be surprised how often a part gets forgotten (Check the rough mix too!) & consolidate the files if you can – it makes it easier to “see” what’s going on in a big session, and psychologically it looks neater! It’s a small thing – but when zoomed “out” you will be able to see where everything is, rather than a mass of edits, which obscure the waveforms.

2. Get the timing right

Especially drums –very important that it’s tight if lots of parts are layered. If there is some unintended “Flaming” going on (i.e. transients of 2 snares that don’t start at the same place, or worse kicks! It can sound messy) In the case of kick drums it can make it sound weaker too, which is very often the opposite of why it’s layered with different sounds.

3. Print Virtual Instruments can be useful

Not everything benefits from this, BUT drums do, and it will help you to see if there is any issues with timing. It also stops you fiddling with the samples and sounds, and concentrate on the mix! As it’s a hassle to reprint. It also frees up system resources, if there is a lot of virtual instruments it can suck a lot of computing power, even with today’s systems, and you will be struggling to have enough power to do the mix.

4. Listen Quietly

It will help if you are in a less than ideal acoustic space (if the room is not acoustically treated, it will get worse with more volume!) I have worked in a few weird sounding places! It really helps when you keep the volume down – the more you crank it, the more any issues with acoustics (or lack of) will show up and you will make bad decisions.

5. Subs can be useful

But only if you have quite a large room (Need 12-15 feet in at least one dimension) and your neighbors will not thank you! (Sub’s tend to throw out in all directions, so it often sounds louder than it actually is, away from the speakers)

6. Listen in Mono

It’s hard to do, but very good for balance (check out other mixes, see if you can listen to them in mono – see where things “Sit” and try and work it into your balance). You might find this teaches you more than you think.

7. Be clear on what you – or the client wants

If you are mixing for someone else – ask what they want! It sounds simple but it’s not good making a “banging” mix with hard drums if they want it “Classic & Warm!” LOL ☺ & ask them what they don’t like, and see if you can fix it (there’s a challenge). Be aware also that they may not KNOW what they want, so it can be a tough job to find the right direction for a mix approach, and might take a couple of attempts, but don’t give up! listen to the rough mix, even if it’s bad, it can give a good overview of what the track is about, and also any problems (Can’t hear the vocals, too soft/hard EQ etc….)

8. Take Regular breaks

Ear fatigue is real, and just because you are young, you are not immune! Sometimes it’s hard – but even a 5-minute tea stop can do wonders for your perspective. And if you are the engineer – if you’re old enough to, please DON’T DRINK ALCOHOL while you work – it changes your perception (for the worse) and you will find yourself questioning things, as it dulls your high end.

9. Watch your levels

Start with the faders down if you can (like on a desk) and build a rough balance – if you have difficulty balancing things (can’t get it loud enough, or the fader is at the bottom, and it’s too loud or disappears) you may need to adjust your levels for better gain staging on each part – remember headroom in channels is GOOD – and the more level in each channel, the harder it will be to build a good mix before everything goes red, and in a DAW that’s mostly bad!

10. Reference other material

Reference other material, and level match it – this is very useful for seeing where you are with the tone (EQ) of the mix – and don’t forget to always print an “Unlimited” master pass, that is one without the limiter if you have cranked it hard – mix compression is ok, as long as you like it.
Have fun with it – and if you are working in a DAW (digital audio workstation) you can always come back fresh and go again!

About the Foundation for Musicians and Songwriters

The Foundation for Musicians and Songwriters is an IRS 501c3 Public Charity that is dedicated to helping Musicians and Songwriters develop their careers in the Music Industry.  We do so without taking a penny or rights from the artist we represent.

To Subscribe to our Music News Updates, Click Here

Click to Subscribe to our Newsletter

Avid ProTools Music Mixing Myths

Mixing with Avid Pro Tools is just like mixing in any other medium… except when it’s not. This is to say that although the process is in most ways akin to how you’d work with any other storage and signal processing technologies, certain distinctive characteristics of Pro Tools lend themselves to somewhat different approaches than you may have previously encountered—and a few aspects of digital mixing may actually have no precedence in the traditional lexicon of production techniques.

This may sound perfectly reasonable, but entering the world of Pro Tools mixing can quickly become an unexpected and confusing mélange of contradiction, confusion, and outright frustration. Ask 10 engineers how to best go about mixing in the box, and you may get as many differing responses. Worse, it’s likely that much of what you’ll be told will neither be backed up with clear explanations nor hold up to thorough and thoughtful analysis. What’s a budding Pro Tools mixer to do?

The Dark Side of Music Production

The audio industry has always had a murky side to it with regards to matters like sonic quality, preferences about gear, and accepted practices for recording and mixing. Mythology has reigned supreme, and many “truths” are held as gospel for reasons that are largely unclear. An SM-57 is the best snare mic, period. Mixes come out better when monitoring with NS-10s. Analog sounds more natural than digital. Tube mics are superior to all others. Oh, and here’s another for you—the Pro Tools mix bus is inferior to an analog mix bus.

Where do these stories come from? There are no doubt a myriad of sources: the many real, legitimate experiences of intelligent and capable professionals; hasty conclusions based on partial or flawed observations by wide-eyed neophytes hoping to break into the business; a fair amount of marketing hype from audio equipment manufacturers; technical commentary made by individuals with no background to support such statements; years of an industry mindset of some that valued secrecy over sharing for fear of giving away personal tricks and techniques… the list goes on and on. What’s clear from observing these forces at work, and the resulting music industry zeitgeist, is that there’s both good information out there as well as a large number of shady beliefs. For the uninitiated, it’s hard to know what to think.

The whole thing is quite a slippery slope, because the final arbiter is hearing, and there’s no way to measure or compare what different people hear. Furthermore, numerous related factors—often unknown to the listener—might support a different conclusion about the basis of some phenomena that otherwise seems to have a simple explanation. What does it mean if a golden-eared engineer claims to hear a subtle artifact that you do not, and offers an accompanying explanation? It could certainly be that he/she truly has exceptional ears that are “better” (or more finely tuned) than yours, and has built a reasonable analysis from that observation. But it could also mean that he/she  thinks there’s something there or wantsto hear it. It could also be that though there’s something going on, the explanation itself is off base. It’s very easy to fool your ears, and just as easy to jump to shaky conclusions even with the best intent.

It’s tempting to offer up the seemingly sage advice to just trust what you hear rather than blindly accept what you’re told. Sounds reasonable, right? But wait—this is exactly the sort of approach that’s caused such rampant confusion in the first place! When it comes to evaluating audio quality and understanding psychoacoustic phenomena, there’s only one way to develop meaningful conclusions—conduct double-blind tests in neutral, controlled environments, such that neither the listener nor the tester knows which options are being heard at any time. Only under these circumstances can you honestly and legitimately reach conclusions about subtle sonic issues. Otherwise, you’ll unfortunately have to be skeptical about both what you hear as well as what you’re told…

To Subscribe to our Music News Updates, Click Here

Click to Subscribe to our Newsletter

Analog Vs. Digital

One of the hot button issues discussed by people who like to talk about this sort of stuff is the difference between using the “mix bus” in a DAW versus using the summing network in an analog mixer (or, more recently, an external summing device designed strictly for this purpose). Actually, there’s no such thing in the world of digital audio as a hardware device with a common conductor fed by all channels in an analog console; Pro Tools and other DAWs use a mathematical algorithm for accumulating the values of multiple signals feeding a mix. But the algorithm does the same thing, so we’ll succumb to peer pressure and call it a mix bus.

But does a digital mix bus behave the same way as an analog version? Some users are convinced that otherwise identical mixes sound different—and better—when routed through the individual channels of a console or dedicated summing network. Many of these folks blame the DAWs’ mix busses, claiming some sort of inadequacy in the algorithm’s ability to accurately sum audio signals.

As the debate rages on, it can be very difficult to separate fact from fiction, and truth from myth. Since it’s a logistical challenge to create an accurate, unbiased test that compares mixes differing only in their summing methods, you’ll have a hard time researching this issue yourself. Fortunately, it’s possible to distill some simple conclusions amidst all of the chatter:

  • There is no evidence that the summing mechanism in Pro Tools—or any other current professional DAW—degrades or otherwise modifies the quality and character of mixes.

  • There can be audible differences between the sound of a mix created via analog versus digital summing. Depending upon the circumstances and the listener, these differences might be characterized as anything from negligible to significant. Typically, the difference tends towards subtle. In some—but not all—cases, producers and engineers prefer the results derived via analog methods.

If the digital audio mix bus is not responsible, what is? This is not understood definitively, but the explanation may be similar to why many other aspects of analog audio technology have a distinctive sound—the artifacts of analog audio that are inevitable byproducts of storage, transmission, and signal processing often act like sonic enhancers, injecting mixes with subtle flavors that to many sounds good. Interestingly, these manifestations of analog audio essentially reveal fundamental shortcomings of the technology, so it’s ironic that the effects can be pleasing. This is most certainly the primary justification for hanging on to more or less antiquated technologies such as analog tape machines, which at this point in time are a complete hassle to maintain and operate except for the fact that they yield desirable results under the right circumstances.

More specifically, how do listeners describe the differences between digital and analog summing? Some have commented on sonic characteristics involving tone, warmth, and detail. However, these are more likely based on related phenomena such as distortion caused by overdriving analog components. Others have noted differences in the width and depth of the soundstage. The actual foundation of such a distinction is unclear.

What’s the bottom line on how all of this affects you? Honestly, I wouldn’t give any of it a second thought. The fact is, until you can master the many other challenges of production—putting together great songs and arrangements, working with amazing musicians playing beautiful instruments, doing all of this in superior sounding recording environments using quality microphones and preamps, and building mixes with inspired balance, tone and depth—worrying about the nuances of digital vs. analog summing will probably distract you from far more important issues…

Latency Issues When Mixing

In general, latency in digital audio is a time delay observed for data at different locations of a system. Unlike traditional analog setups, in which everything occurs more or less instantaneously, various processes in a digital audio signal chain require small but detectable amounts of time to complete. The primary culprits are tasks such as conversion, disk access, and signal processing. Since each of these can themselves contribute measurable delays in handling audio, latency is cumulative when a signal is subject to multiple processes in series.

If you have ever recorded through a DAW, you have likely dealt with latency in the recording process.  Delays can wreak havoc on a musician monitoring a live performance.  We’ve seen that reducing the size of the hardware buffer and forgoing signal processing on live signals can improve monitoring latency to an acceptable level. Though converter latency cannot be eliminated, using higher sample rates does help.

Latency can also be an issue when mixing. However, in this case the problem isn’t that audio is delayed between disk playback and monitoring. Though this does occur, the only time it could matter is when theamount of latency varies on different channels. As long as latency is the same for all channels, the only repercussion will be a (typically) imperceptible lag when entering playback.

Without inserts, there’s nothing in the signal flow of an Audio track that introduces latency.

Without inserts, there’s nothing in the signal flow of an Audio track that introduces latency.

When latency is the same on multiple tracks, signals arrive at the mix bus simultaneously, and will not interfere with one another.

When latency is the same on multiple tracks, signals arrive at the mix bus simultaneously, and will not interfere with one another.

Having seen that it’s not unusual for audio signal paths to exhibit latency, when is the amount of channel latency different? When mixing, there are two possible scenarios:

    1. DSP plug-ins always introduce a small (and occasionally not so small) amount of latency.

    2. Native plug-ins sometimes introduce latency, if their algorithms utilize look-ahead processing.

    3. Analog hardware inserts always introduce latency due to the conversions necessary to route the signal to the external gear and back to Pro Tools.

    4. Digital hardware inserts sometimes introduce latency, if the external hardware’s algorithms utilize look-ahead processing.

      Different signal processors on channels. In some cases—though not always—latency will be introduced due to channel inserts: 

  1. Different routing used for channels. When sending the output of certain tracks through a bus and subgroup (as we’ll demonstrate next week), those tracks will be slightly delayed.

    In this example, bass signals enter the mix almost a millisecond later than simultaneous snare signals. However, it’s highly unlikely you’ll hear this difference.

Here’s the tricky part: the only time this matters is when the relevant tracks contain in part or completely the same material. This would be the case if:

  1. You’re summing together a processed and unprocessed version of the same signal. This can be a nice technique when you want the sound of (typically) extreme processing but also want to maintain some of the original signal characteristic.

  2. You’re processing a track for an instrument that was recorded with multiple microphones. Let’s say you’re compressing a snare mic. Since the snare sound is also picked up by the overheads and other drum mics, the phase relationship between these tracks changes if the compressor exhibits latency.

    Here, snare signals enter the mix later than the drum overheads. Since the overheads also pick up the snare, phase cancellation can occur.

In these scenarios, the combination of a processed track with latency along with similar tracks without such delays generally results in some sort of phase cancellation.  Phase cancellation is generally not desirable, but all is not lost. Fortunately, it’s possible to compensate for latency so that you can implement any of the above setups without interference problems.

If you’d like to explore the issue of latency further, here’s an informative primer on the topic written by Digidesign: Latency and Delay Compensation with Host-Based Pro Tools Systems

Floating- vs. Fixed-Point Mathematics

Another topic of some dispute is the computational approach used in various DAWs to crunch numbers for signal processing. It turns out that software developers might implement different methods, depending upon factors such as hardware support, ease of coding, and portability. Some DAWs utilize floating-point math, in which data is represented in a manner resembling scientific notation. Others do fixed-point math, using a prescribed number of integral and fractional digits. There are those who feel that floating-pointmath is superior since it is more flexible and can convey a wider range of values than fixed-pointcomputation given the same number of digits. However, the resolution of floating-point representation decrease as the values increase, and the noise floor also varies. Ultimately, proper coding should make these issues insignificant. If you don’t believe me, maybe you’ll listen to Colin McDowell, founder and president of McDSP, one of the leading developers of third-party plug-ins for Pro Tools and other DAWs:

“If the fixed vs. floating point question is in regards to algorithm quality, the difference should be negligible. The code can be created on either platform to equivalent specifications. As long as the input and output bit depth are equal to (or greater than) the bit depth of the files being processed, and the arithmetic processing is double that bit depth (i.e. double precision), output signal noise level can be made to be lower than the smallest value representable in the output format.”

In the past, Pro Tools HD required TDM hardware whose DSP chips utilized 24-bit inputs and outputs, while RTAS signal processing supported by host-based systems was based on 32-bit floating point arithmetic. Both were capable of producing high-quality results, but some users felt that subtle differences could be identified between the two methods. What could have explained these perceptions? Was this another example of mind over matter, or were there differences in coding methods that could yield audible disparities?

Fortunately, as of Pro Tools 10 the above issue is of academic interest only since all computation is now performed via 32-bit floating-point math. By design, the DSP chips used in HDX hardware do floating-point arithmetic just like the signal processing in host-based sytsems, so (essentially) the same algorithms can be used for both native as well as DSP processing. It’s nice to know that any given plug-in should sound the same regardless of the platform, and the use of 32-bit floating-point math also provides a mamouth amount of headroom that makes it virtually impossible for users to overload computation engines.

To Subscribe to our Music News Updates, Click Here

Click to Subscribe to our Newsletter

How to Get Your Music Into YouTube Content ID

Whenever YouTube describes its efforts to fight back against copyright infringement and discourage misuse, it’s always quick to point to its Content ID system.

Content ID is the system, first rolled out in 2008 and extended to music in 2010, through which rightsholders are able to upload their content to a database that YouTube then uses to match against works uploaded to the site by third-party users. When the system detects a match, the rightsholder can then choose what to do with it, including simply tracking the content, monetizing the claim or, if desired, blocking the video outright.

This system is powerful, and has allowed some artists and rightsholders an additional degree of agency. It’s also been the subject of a number of controversies, both among artists and YouTube users, with the latter launching a campaign that forced YouTube to make adjustments to the system.

But despite controversy, Content ID is still a potentially useful tool for any musician or record label. The ability to control and/or monetize music on YouTube is powerful; different artists working in different genres with different business models and varying assumptions about the scale of their audience will find it makes sense to use the tool in different ways. For the lucky artists who rack up huge play counts, monetization could add up to a meaningful revenue stream. Other artists will focus on using Content ID solely to prevent infringing content from appearing on YouTube, encouraging their fans to listen in ways that are more remunerative. Still others may take a case-by-case approach.

However, not every artist has the same range of choices. YouTube doesn’t make it abundantly clear how to join Content ID. Its copyright page, for example, shows how to file a takedown notice and how to dispute a Content ID claim, but doesn’t clearly lay out how a creator can get her work included in the automated detection system.

Fortunately, there is an application process. However, for many artists or small independent labels, direct access to Content ID may still not be made available, depending on their circumstances.

Is your work already in Content ID?

Some musicians may be surprised to find that their work is already included in Content ID. If you release recordings with a label that works with a digital distributor, your recordings may already be in the database. (Sometimes, artists find this out the hard way when they receieve a copyright notice on their own YouTube Channel).

Unfortunately, it may not be easy to obtain the actual terms of the deal governing the use of your work. Such deals are typically covered under non-disclosure agreements, so we’re not even allowed to look at them, but anecdotally their terms seem to vary—with different deals offered to major labels, independents working through the licensing body Merlin, or the many unaffilliated artists out there. This is one area where you should insist on transparency from your commercial partners. It is important to be proactive with your label and/or distributor and make your wishes known about how, when, and whether you’d like third-party uploads of your work to appear on YouTube. You may have more options than they’ve told you about.

Applying for Content ID

To find where to apply for Content ID, you have to dig through YouTube’s help files. Eventually though, you’ll land on this Content Identification Application, which is the first step to joining Content ID.

The form itself is fairly straightforward, asking for contact information, details on the types of and amount of copyrighted content you control and your reasons for wanting to join Content ID.

However, filling out the application is no guarantee that you will be accepted into Content ID. As YouTube says, “Content ID acceptance is based on an evaluation of each applicant’s actual need for the tools. Applicants must be able to provide evidence of the copyrighted content for which they control exclusive rights.”

In short, if YouTube either doesn’t feel the tool is a good fit for you or that you have not provided adequate evidence of exclusive rights, that it will reject your application. It’s a little odd that YouTube thinks it’s in a better position than you to determine whether you “actually need” this tool, and their criteria for evaluation are frustratingly vague. In the context of bigger debates about the widespread problem of infringing content on YouTube, citing Content ID as a comprehensive solution looks dubious when access to those tools aren’t available equally to creators big and small.

As far as we can tell, the application process tends to favor larger rightsholders, those with thousands of individual songs in their catalogs. This makes a certain amount of sense, since rightsholders that are accepted into the program are required to comply with technical actions such as uploading the content, providing the proper metadata for Content ID’s CMS and so forth. And it’s understandable that YouTube would want to be somewhat careful about who they let into the system. Content ID’s effectiveness would certainly be compromised if a flood of people were empowered to use an automated system to claim ownership of stuff that isn’t theirs. (On the other hand, they’ve already got a flood of clueless uploaders writing “I do not own this; no copyright intended!” so there is some asymmetry to consider here.)

Those who don’t “qualify,” for whatever reason, are often sent to alternative services, such as YouTube Content Verification Program, which is aimed at helping copyright holders expedite takedown notices against infringing uploads. But that’s not a satisfactory alternative for artists and rightsholders who see their stuff being used without permission and are frustrated that a takedown of one link doesn’t prevent a new link of the same infringing content to be repopulated by another user.

As a result, many independent rightsholders that are eager to join Content ID end up taking an alternate approach to signing up, one that involves working with a middleman.

YouTube Partner Services

YouTube Partner Services are companies that act as an intermediary, briding the gap between smaller creators and YouTube’s Content ID system. This approach is recommended by ASCAP for performing songwriters who want to participate in Content ID and continue to collect royalties through their PRO.

The idea is straightforward. Partner companies work with a large number of smaller creators and manage their YouTube Content ID for them, handling both technological and legal hurdles. In exchange, they take a percentage of the revenue, usually between 15% and 30%.

Some examples include AudiamAdRev, Vydia and ONErpm. These services are often paired with other distribution assistance, such as making your music available to streaming music services or digital download storefronts.

However, it’s important to note that, when these services work with Content ID, they tend to focus (almost exclusively) on monetization, not removal. As such, musicians that go through partner services often don’t gain an ability to use Content ID to take down unwanted videos, and, in some cases, may lose a portion of their revenue on their own channels.

So far, the only services that we’ve been able to confirm that allow musicians to take down unauthorized copies if they choose are AudiamExploration.io and Believe Digital, and ONErpm, and even with these, you may need to make a special request to be able to block or mute unauthorized uploads.

Failing to give creators the full range of tools is a serious weakness for many partner companies. Still, for independent musicians eager to take advantage of Content ID monetization, a partner service is likely the easiest path. Just read any contracts that are signed very closely and be aware of any rights that you are giving up and for how long you are doing so.

Conclusions

When it comes to Content ID, there is very little that is simple. Everything about the process including signing up, uploading work, making claims and dealing with appeals is, in its own way, complicated. And like too many parts of the music business, it lacks transparency, and seems oriented to deal with the needs of the bigger commercial players.

Yet there is some real potential here if the tools are made available to the full range of creators. Detection technology is still relatively new, and all companies that offer such tools should prioritize inclusivity, transparency, and accessibility, whether it’s Content ID or competing systems like Audible Magic.


To Subscribe to our Music News Updates, Click Here

Click to Subscribe to our Newsletter

Can the new MQA Music Format Finally Fix ‘The MP3 Mistake’?

There has been a lot of chatter over the years about the problems with MP3’s.  They simply do not capture the fidelity of the original recording.  AAC has gone a long way to help that, but even then there is compression and sacrifice.  When we use compression we lose quality.  Those 1’s and 0’s have to be thrown out to make the file smaller.

File size was a much bigger issue when the first iPod’s came out than it is today.  Hard drive space is cheap and the price is decreasing every day.

Craig Kallman, chairman and CEO of Atlantic Records was interviewed by Billboard Magazine.  When he was asked about fidelity his response was, “Now is when we finally have the technological capabilities and the bandwidth capability to deliver people a convenient experience that also includes a true high-resolution audio result at the same time.”

Atlantic, Warner Music Group, Tidal, Pioneer, Onkyo and many others are starting to look very seriously at a new company called Master Quality Authenticated, or MQA for short.  They provide a new kind of audio stream that they are calling Music Origami, which is basically taking the parts of a recording that are typically discarded and wrapping it into a compressed music file.  The trick to what they are doing is putting the data under the noise floor.

Here’s a video of the MQA CEO expelling the process.  He does a lot better job than I can.


Most of you have likely seen similar technology in action if you watch streaming movies.  Have you ever notice that sometimes a movie is crystal clear and it may drop down in quality if there is a bandwidth problem?  That is basically what is going on with MQA Origami.  When bandwidth is sufficient to support a 96kHz stream the full file is sent providing original fidelity.  The technology will step the quality down as bandwidth decreases to the point that we hear today from streaming services.  This technology, however, is not limited to streaming services.  There could be a day when music is mastered and distributed to end-users in the MQA format.  It would simply take a new codec to uncompress the file.  A software update would be all it would take to enable devices that have sufficient processing power.

How does MQA impact Musicians Now?

I’m glad you asked 🙂  To benefit from future technological enhancements we need to always keep an eye on the future.  Home musicians often record at lower sample rates (e.g. 44.1 or 48kHz).  CD’s and MP3’s are 44.1 and AAC files are 48kHz.  The higher the sample rate and bit depth of audio being recorded increases the file size considerably.  a 44.1 kHz mono file requires 5 megabytes of disk space per minute at 16-bit and 7.5 MB at 24-bit.  A sample rate of 88.2 kHz consumers twice as much space as 44.1.  Creating music requires numerous files.  A drum set alone can have 8 or more dedicated tracks.

Most of the non-pro musicians I see record at the highest level they think they will need, which is most often 44.1 kHz 16-bit.  The ones with Apple iTunes distribution in mind typically use 48 kHz 24-bit.  However, the pro-studios that make the hit records generally record at 96 kHz 32-bit floating point.  Why?  Because pro-studios and record companies look toward the future.  They can remix and sell their 96 kHz files as technology improves.  A simple release of a remix album can bring in big $$ with minimal effort.

Remixing in mind is very likely the reason Atlantic and Warner are investing in MQA.  They not only can sell remixed files at studio levels, the record industry has majority ownership of Spotify.  Incorporating their high-fidelity streaming files into Spotify could leapfrog them over the competition that is not using the new technology.

Conclusion

Bottom line for recording musicians is to record at the highest quality your equipment can support.  You may also want to read though the Apple iTunes Mastering specifications.  Apple prefers to have master files sent to them far above what is needed today for recording.  Why?  Because they are planning ahead as well.  If they have the high facility files in hand they can easily stream at a higher bitrate when the technology is ready.

About the Foundation for Musicians and Songwriters

The Foundation for Musicians and Songwriters was established to help in all areas of artist development.  FMS through the generous donations of our sponsors can bring in the resources artist need to establish a career that can influence future generations.

FMS has the connections, insight, eCommerce expertise and business acumen that the vast majority of Musicians and Songwriters don’t have.  Accordingly, as a 501(c)(3) organization, donations to FMS are 100% tax deductible, which helps our Donors pay-it-forward and promote the continuation of music for future generations — benefiting all of humanity.  As a Music Foundation, every dollar we rase is used to develop the artist so they can make a living in the Music Industry and get their music to the world.

To Subscribe to our Music News Updates, Click Here
Click to Subscribe to our Newsletter