We thought it would be good to review options for configuring an effective and inspiring mixing environment. We’ll pull together certain techniques that the Pro’s use, consider new ways to utilize some tools, and explore additional Pro Tools features that can significantly enhance the mixing process.

Anyone that has mixed before has seen how beefing up a system can facilitate taking on larger, more complex projects. Nowhere is this more imperative than when mixing. You just can’t get enough of certain items:

  • Control surface features. Mixing is all about making repeated control adjustments until you’ve gotten parameters just right. How do you make these adjustments? Perhaps largely using the graphical editing tools we explored last week, but everything else you do involves setting linear fader levels, rotary pot positions, and other types of controls. Control surfaces make these actions considerably easier, so it won’t be a surprise if you use these features more when mixing that at any other stage of the production process.

  • Screen real estate. With or without a control surface, mixing benefits from as much display capacity as possible. Besides having access to both the Mix and Edit windows, you’ll often want to show multiple plug-ins as well as other windows. Larger monitors are always good, but a second display is even better. 

  • Processing power and RAM. The amount of number crunching going on within a mix can be staggering. Unless you’re making minimal use of signal processing, faster multi-processor or multi-core hosts for native systems—or additional DSP cards with an HD rig—will enable you to manage far more involved mixes. Likewise, additional RAM will boost general performance and enable the use of more plug-ins, particularly processor hogs like convolution reverbs.

  • Plug-ins. Of course, all of this processing power won’t help if you don’t have much in the way of plug-ins. The standard suite of Pro Tools plug-ins is a nice start, but you’ve already seen how additional Avid as well as third-party products can dramatically enhance your capabilities. For mixing, you may want to start by looking at additional ambience and effects processors, since these are not the strongest elements of the basic Pro Tools collection.

Although generally speaking most mixing beginners use systems with a single monitor with and without a basic control surface, you can imagine that display options can be much more dramatic with expanded systems. However, if you are fortunate enough to have two monitors and do not have a control surface, you’ll likely want to dedicate one monitor for the Mix window and the other for the Edit window.  If you prefer to do most of your work using the Edit window, you might toggle between Edit and Mix on your main monitor and reserve the second for plug-ins as well as other frequently used windows (Memory Locations, Automation, etc.). With two monitors and a control surface, there’s rarely any reason to access the Mix window. Maximize the Edit window on the main monitor, and use the second as described above.

When using a single monitor, how can you optimize the display? Consider these options for the Edit window:

  • View the left (tracks/groups) column. Though you can use Groups List Keyboard Focus mode (introduced in the next topic) to enable and disable groups, you’ll miss some nice features without access to the Groups List.

  • Hide the Clips List. Yes, there are commands in the Clips List popup menu you might need when mixing, but some have shortcut equivalents, and much of the time these are not necessary.

  • Select inserts, sends, and I/O view options. The I/O column allows you to bring up Output windows and use quick shortcuts to access automation playlists, so this is a good option when you’re mixing primarily with the Edit window.

  • Show the Automation and Memory Location windows. These may be accessed frequently, so consider dedicating a typical area for them.

  • Hide the Transport window. At this stage, it just gets in the way, and you can display transport controls in the main Edit window toolbar and/or set the numeric keypad to Transport Mode for control of everything you need.

  • View one plug-in at a time. Though it can be really convenient to have more than one plug-in window on screen, they will quickly obscure the rest of the session. Alternatively, use the commands introduced below to facilitate working with multiple floating windows.

Your base display might look like this:

However, it is sometimes very useful to include multiple floating windows in your screen layout. For example, you might want to display several plug-in windows in order to compare EQ settings on various channels, or utilize a series of output windows to provide mixer-like functionality while maintaining the basic Edit window perspective. Some users don’t bother with such configurations, since it takes a bit of effort to open and close all of the windows. However, there are a couple of newer Pro Tools features that greatly facilitate these scenarios:

  • Hide floating windows. The command Window > Hide All Floating Windows makes it much easier to utilize multiple windows. Rather than closing and reopening floating windows manually—a minor but annoying hassle—you can simply hide them temporarily. You can also use the shortcut Command-Option-Control+W (Mac OS) or Control-Alt-Start+W (Windows).

  • Create custom Window Configurations. A handy part of the Pro Tools feature set is the ability to name, store, and recall the configuration of windows in a session as well as the view options of the primary windows.

Color coding is the type of feature that might seem trivial at first glance. However, it can really enhance the usability of sessions by providing an additional dimension of feedback that helps you differentiate repeated elements with similar features.

Three aspects of the Edit and Mix window displays can be customized with color coding preferences:

  • Color bars that appear in several locations

    • above and below each channel strip in the Mix window.

    • to the left of each track in the Edit window track area.

    • to the left of each track name in the Tracks List.

    • to the left of each group name in the Groups List.

  • Track area display in the Edit window

    • clip shading in Blocks or Waveform views.

    • waveform color when viewing automation playlists.

  • Shading between markers in the Markers ruler.

Note that of these options only the Track Color view affects the Mix window display.

Color coding selections are made in the Display preferences tab. Track Color Coding settings apply to all color bars, and Clip Color Coding settings determine clip and waveform shading. Marker ruler colors are enabled via the first checkbox, or when choosing the Marker Locations option for clips.

How important is the brightness and contrast of the Pro Tools interface? Perhaps more than you’d think. Consider the dramatic changes made to the graphical user interface way back when version 8 was released:

A session opened in Pro Tools 7.4

The same session as of Pro Tools 8.

The difference is not subtle. If you’re like most people, you either love the updated interface… or can’t stand it! At that time, many who preferred the “classic” version liked the bright display and contrast that could make it easier to differentiate on-screen elements. Some who preferred the revised version found it more comfortable for viewing, especially during long sessions.

What do you think? Regardless, there are additional display options that allow you to modify the standard grey background if you find it unappealing. The Color Palette window can be used to customize interface colors, and in particular alter the shading of channel strips.

The Brightness slider can make a big difference for background contrast. You also might want to experiment with the Apply to Channel Strip button shown above, along with the Saturation slider, to shade channel backgrounds according to the active color coding preference.

If you’re consistently well organized, carefully manage your assets from the very first tracks and clips in a session onwards, and follow recommended procedures for recording, overdubbing, and editing, you can skip this section. On second thought, even the most rigorous and diligent engineers should still read on. This is a good time to review various ways to prepare a session for mixing, and there’s a good chance you haven’t tended to at least a couple. Furthermore, you may inherit a project from another engineer and find yourself forced to deal with someone’s mess, or get a gig remixing an existing record. Despite your best intentions, you nonetheless may need to deal with the following elements of a session prior to mixing:

  • Rename tracks. Don’t be surprised when you’re hired to mix a session and track names are obscure and unrecognizable. Restrict names to 8 characters or fewer so that certain control surface LED scribble strips won’t truncate them.

  • Add markers. The complete song form should be clearly and precisely outlined so that every major transition is easily located. This will also facilitate selecting sections of a song in order to create snapshot automation.

  • Create selection presets. It’s also handy to define preset selections for frequently accessed sections of a song.

  • Construct a beat map. Even if you didn’t do this for editing, a beat map can also come in handy when mixing for techniques such as synchronizing plug-ins with the performance.

  • Create display presets. Memory locations can also be used to store detailed display configurations with customized track show/hide status, height, group enables, zoom settings, and window configurations. For example, you might have a setup for submixing background vocals that includes displaying certain tracks with specific heights and zoom settings. Such presets generally should not have time properties designated. 

  • Define groups. This is a powerful feature that facilitates linking controls on related tracks. We’ll address it in detail in the next topic.


  • Clean up. The track area in particular can get increasingly messier as a production progresses, and is often at its worst when mixing commences. We’ll discuss how to approach such problems on the next page.

  • Print Instrument tracks. You’ll probably need as much processing power as possible for plug-ins when mixing. Virtual instruments typically demand an inordinate percentage of available resources, so you should consider bouncing them to Audio tracks. 

In theory, your tracks and edits will be clean as a whistle when it’s time to mix. In reality, that’s not always the case. Although you’ve presumably sliced and diced the playlists already, some rough edges may remain. Try to address the following prior to mixing:

  • Trim tops and tails. Although it’s possible to keep your clips intact and automate mutes in order to control where they begin and end, it’s a much better idea to trim back clips. You’ll save processing power for more important tasks, and there’s no risk of inaccurate automation timing.

  • Clear other excess. Similarly, you should delete unwanted audio within larger clips. Done properly, your playlists will contain concise clips where tracks play, and will be clear elsewhere.

  • Add fade-ins and -outs. If you trimmed clips as close as possible to the desired audio, it’s possible you’ll need a short fade to smooth the transition. You might want to trim up the entire session and then apply batch fades to make this quick and easy.

  • Check existing edits. It’s possible that some of your crossfades did not end up as clean as you’d like. Verify the integrity of these, or go through a single batch process as above.

  • Consolidate. We discussed consolidating audio two weeks ago, but you sometimes won’t do this until ready to mix. Since consolidating combines all of your edits into a single clip, you may prefer to wait until you’re certain that no further changes will be needed. Consolidation can be useful prior to mixing to reduce the disk access load in sessions with high track counts and edit density. 

When mixing, you’ll often need to make an identical adjustment on multiple tracks simultaneously. Perhaps you want to raise all of the guitar tracks—whether you have 2 or 20—by 3 dB. Or mute the entire drum kit for two beats. Or trim the tails of a set of background vocals. Or… well, do almost anything you’d do on a single track.

There are two ways to approach these scenarios that don’t involve painstakingly making the exact same moves on each track. Grouping can make your work much easier in all phases of the production process, but especially when mixing.

We’ll look at a variety of considerations pertaining to implementing and using Pro Tools grouping features, including significant new features, enhancements, and changes introduced in recent versions. Complete the reading below before continuing.

General Characteristics of Groups

Fundamentally, grouping seems like a simple enough concept. However, a closer look will reveal some fairly sophisticated and versatile capabilities. We’ll start by identifying the general characteristics of Pro Tools grouping features before exploring how they work in your sessions:

  • Recent versions do more. Grouping in older Pro Tools versions was a useful but basic feature. It’s now both useful and extremely powerful. Noteworthy enhancements include:

    • more groups (104, in 4 banks of 26)

    • enhanced Create Group dialog with additional options

      As of version 12 the Create Group dialog supports both global as well as individual group attributes.

    • no need to select tracks prior to invoking the New Group command

    • no longer necessary to overwrite existing groups to modify their specifications

    • revised Groups List popup menu

    • ability to specify which controls are grouped

  • Basic grouping and VCA-style grouping are different. When using the functions discussed in this topic, a control change on a grouped control on any track results in the same change to all group members. There’s another option—VCA-style grouping—in which multiple tracks can be controlled by a remote master, but the controls on the individual channels only affect a single track. (Requires either Pro Tools HD or version 12 or higher software.)

  • Fader (or other control) levels on grouped tracks maintain the same relative positions when adjusted. For example, if you raise a fader on one group member such that others top out, the relative positions are restored when you lower the levels.

  • Groups can be specified for edit functions, mix controls, or both. An Edit group only affects specific edit functions:
    • track view
    • track height

    • track timebase

    • editing functions such as selecting or trimming multiple tracks

    • automation functions such as inserting or modifying data on multiple tracks

 Mix groups can include fader, mute, and other controls (many more with Pro Tools HD). Edit groups do not include these controls, even when utilizing Edit window channel controls.
  • Groups can also be nested. You can define and use multiple groups with overlapping members. The Group ID for any channel appearing in two or more active groups is displayed in upper case.

Here, we’ll quickly review the steps required to create a Group in ProTools.

  1. Use any of the following methods to access the Create Group dialog:

    1. Invoke the command from the Track menu.


    2. Invoke the command from the Mix Groups list or Edit Groups list popup menu.


    3. Use the shortcut Command+G (Mac OS) or Control+G (Windows)


      NOTE: With previous versions of Pro Tools, it was necessary to select all tracks to be grouped prior to invoking the New Group command. This is (conveniently) no longer the case.

  1. Enter an appropriate name and select an ID.

    NOTE: You don’t have to stick with the default consecutive IDs for your groups. It can be helpful to use letters that relate to the group members (d for drums, for example), or come up with a standard configuration you’ll remember in all of your sessions. By doing so, you can facilitate enabling and disabling groups using Groups List Keyboard Focus (described below).

  2. Select the group type. If you’re not sure whether you’ll need the group for edit or mix functions, select both types; you can always modify this later.

  3. Select the attributes that will be linked on Mix group tracks (in addition to the fader level and automation status, which are always linked).

     NOTE: In version 12 and higher, you can also assign the group to an available VCA Master track.
  4. Select the tracks that will be members of the group, using one or more of the following methods: 

    1. To add selected tracks to the group member list, click on Add.

    2. To add selected tracks to the group member list in place of any members currently in the list, click on Replace.

    3. To add tracks from the Available tracks list, select one or more in the list, then click on Add >>.

    NOTE: Press A on the keyboard to add tracks selected in the Available list.
6. Click ok

It’s not uncommon for you to want to modify characteristics of a group. For example, you might record new tracks that are consistent with an existing group, or find that you’d rather not have an Edit group also link track controls. In the past, you’d have to create a new group and overwrite the previous one to effectively modify it. That’s not necessary anymore:

  1. Access the Modify Groups dialog using any of the following methods:

    1. Select Modify Groups in the Edit Groups List or Mix Groups List popup menu.

    2. In the Mix window, click on a track’s Group ID Indicator and select Modify in the popup menu.

    3. Right-click or click and hold on the group name in the Edit Groups List or Mix Groups List, then select Modify in the popup menu. 

  2. Set the group parameters as you would when creating a new group, starting with the group ID.

    1. The Remove button in the Modify Groups dialog provides an easy means for removing one or more tracks from the current group members.

    2. The handy—but dangerous—All group (discussed shortly) can be modified to make it somewhat less dangerous by restricting it to only act as an Edit or Mix group.

Two of the methods for modifying groups also provide a means for deleting a designated group:

  1. In the Mix window, click on a track’s Group ID Indicator and select Delete in the popup menu.

  2. Right-click or click and hold on the group name in the Edit Groups List or Mix Groups List, then select Delete in the popup menu.
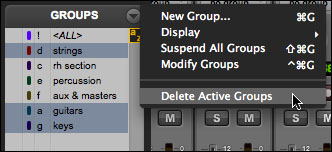
You can also delete all currently active groups with the aptly named Delete Active Groups command in the Edit Groups List or Mix Groups List popup.

NOTE: Deleting groups is not undoable, so be certain you really want to do this. Don’t worry; you’ll be reminded. Also keep in mind that deleting groups leaves the actual tracks intact.

Don’t discount the possibility that a grouped pair of mono tracks might occasionally be more effective than the typical stereo configuration. It’s true that a single stereo track is usually best for two-channel sources such as virtual instruments or stereo miking. However, you’ll sometimes want to treat one side of the pair differently than the other, like using a different plug-in on the left and right channels. In this case, it might be convenient to simply work with mono tracks but group them to easily adjust their general control settings.

In this section, we’ll explore a variety of aspects related to using channel inserts in Pro Tools sessions. We’ll start by considering several general insert issues, including the potential for misusing plug-ins, insert signal flow in applicable tracks, and the distinctions between multi-mono and multi-channel formats. We’ll review basic methods for instantiating inserts, and throw in a few new tricks for simultaneously adding or deleting multiple inserts, as well as moving and copying them. We’ll look at several options for organizing plug-in menu listings, including basic preferences, custom plug-in favorites, and default EQ and compressor settings. We’ll identify the performance issues relevant to heavy use of plug-ins, and suggest appropriate settings for optimizing plug-in capabilities in mix sessions. We’ll revisit the concept of plug-in latency discussed earlier this week, and see how to mitigate the potential problems of phase cancellation. Finally, we’ll survey a variety of specific techniques that will be helpful when utilizing inserts. Complete the reading below, and then we’ll get started.

Inserts and real-time plug-ins are not equivalent. It’s easy to think of these as identical, since all real-time plug-ins are instantiated as channel inserts. However, hardware I/O channels can also be utilized for inserts, and this has nothing to do with internal signal processing. We’ll be dealing with plug-ins almost exclusively here and will use the terms somewhat interchangeably, but keep in mind that there is an alternative.
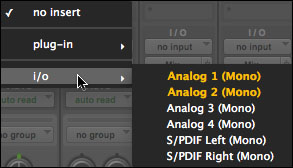
Scroll past the plug-in submenu when instantiating an insert to access another submenu with hardware I/O options.


If your audio interface only supports two inputs and outputs, it won’t be possible to use hardware inserts. (You’d need at least one unused input and output channel, and the main stereo monitor outputs would preempt any others.) 
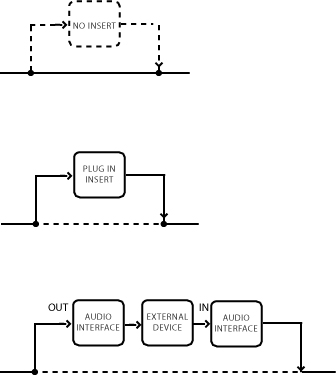
When a plug-in is inserted in a channel, it interrupts the normal signal flow and routes audio through the plug-in software. When an I/O channel is inserted in the signal flow, audio is routed to the designated audio interface output channel, through an external device, and back through the corresponding audio interface input channel.

Messing around with signal processing can be one of the most enjoyable aspects of production. But beware: just like with anything else, too much of a good thing can quickly cease being so good. Novice engineers often fall into one or more of these classic traps: 

  • Overprocessing. It often seems like it’s easier to crank up the controls of an on-screen device as opposed to actual hardware. There’s something about turning a pot all the way up that breeds caution more than clicking and dragging.

  • Too many plug-ins. There’s rarely a good reason to use three, four, or even five inserts across the board. Nonetheless, some engineers appear to believe that more is better. It’s not.

  • Poor gain staging. In theory plug-ins can be overloaded, and unlike classic analog gear they won’t sound good when doing so. Fortunately, the 32-bit floating point processing used by AAX plug-ins provides essentially unlimited headroom, so this is no longer a critical issue. Still, I’d pay attention to gain staging—at some point, even if only with regards to hardware inputs and outputs, you’ll have to stay within proper operating limits.

The channel signal flow for Audio and other track types is not complex compared to traditional consoles, but you still need to be aware of how it works. In Audio, Auxiliary, and Instrument tracks, inserts are always pre-fader and appear in series beginning with Insert A. Keep in mind the order of insert slots when setting up signal processing. If, for example, you want your EQ to follow a compressor, you don’t want it placed in the first slot. 

Five inserts are shown here, but all Pro Tools audio-based tracks provide a second bank with five more.

Once instantiated, insert order can usually—but not always—be changed. If you invoke a plug-in with, say, a mono input and stereo output, it cannot be placed ahead of a plug-in with a mono input.

You’ve probably noticed the options of both of multi-mono and multi-channel formats when instantiating plug-ins on stereo tracks. What’s the difference?

  • Multi-mono plug-ins are linked pairs (or larger configurations with surround mixing) of independent processors. The controls can also be unlinked to provide independent adjustment of each channel.

  • Multi-channel plug-ins act like single processors regardless of their input and output configuration. Often, the processing itself is linked. For example, reverb effects may be based on a complex combination of both input channels, and multi-channel dynamics tools generally link gain reduction in both channels to be triggered by an input on either. 

You’re already familiar with how to instantiate a plug-in insert using the ten Insert Selector buttons on each track in the Mix and Edit windows. We’ve also demonstrated how the Plug-in and Insert Position Selector buttons in plug-in windows can be used for these purposes.

Within a channel, just click on the plug-in Insert selector for the desired slot.

Within a plug-in window, first select the insert slot.

Then instantiate a plug-in.

The same controls are used to remove instantiated plug-ins.

no insert

These methods can be extended to instantiate or remove multiple plug-ins simultaneously:

  1. To instantiate or remove the same plug-in on every visible track, press and hold the Option key (Mac OS) or Alt key (Windows) while instantiating (or removing) a plug-in.

    NOTE: Why doesn’t this technique apply to the second channel? It’s a stereo track, and only plug-ins with the same format will be affected. Note that you can use the Plug-in Selector on any track to both instantiate and remove.

  1. To instantiate or remove the same plug-in on every selected track, press and hold Option-Shift (Mac OS) or Alt-Shift (Windows) while instantiating (or removing) a plug-in.

  2. To move an insert to a different position, click and drag the insert to the desired slot. You can move an insert to a different slot on the same channel or to a different channel, but the format must match. If you drag the insert to a slot that already contains one, it is replaced.

  3. To copy a plug-in to a different slot, press and hold the Option key (Mac OS) or Alt key (Windows) while dragging the plug-in to that slot. The duplicate plug-in will have identical settings as well as any applicable plug-in automation.

As you build up your plug-in collection, the process of instantiating can get awkward. Popup menus become unwieldy when the number of items is lengthy, and it’s easy to miss your target when scrolling through multiple submenus. Fortunately, there are a few simple Pro Tools features that can improve the process:

  1. Menu Organization. You can set the preference that determines how the plug-in menu is organized to best suit your needs.

    Menu Organization

    The Flat List is not going to help matters much unless you absolutely despise popup submenus:

    With the Flat List display, the popup length may exceed your screen height!

    Organizing by Category is the default option:

    Organizing by Manufacturer might work for you, but in many cases you’ll end up with a submenu imbalance that won’t make the process any easier:

    Note that the Avid submenu includes Melodyne and Reason, since the plug-in itself is just the ReWire link to external software.

    The Category and Manufacturer option simply provides both organization systems, which presumably is useful under certain circumstances…

  2. Plug-in favorites. If the plug-in menu organization preferences leave you wanting easier options, fear not—there are two other handy features. You can add your most frequently used selections to the root level of the plug-in submenu by pressing and holding the Command key (Mac OS) or Control key (Windows) while selecting the desired favorite.

  3. Default EQ and Dynamics. Even more convenient is the option to place default EQ and dynamic plug-ins as the first two choices in the root level of the insert popup menu, making them incredibly easy to instantiate. Set the default choices in the Mixing preferences tab.

    You can choose any installed EQ and dynamics plug-ins for default choices.

    Default processors are always the first selections in the insert pop-up menu.

Many of the issues we considered for recording are also applicable to the mixing process:

  • Optimize the host computer’s operating system, and disable unnecessary features.

  • Refrain from running other applications in the background, unless they are related to your project (i.e. external VIs such as Reason).

  • Prior to Pro Tools 11, set the Pro Tools CPU Usage Limit as high as possible, while allowing sufficient resources for basic OS tasks such as screen redraws as well as necessary background applications. (Accessed via the Playback Engine dialog.)

However, certain settings that are appropriate for recording must be approached differently for mixing:
  • Host Processors. Prior to Pro Tools 11, with multiprocessor and multi-core hosts you can dedicate some or all of the additional CPU power to real-time plug-ins. This is not necessary when recording, since you’ll generally want to minimize plug-in use to avoid monitoring latency. Mixing is an entirely different story. Try to reserve as much processing power for native plug-ins as is feasible without sacrificing OS performance or automation accuracy. Typically, you’ll reserve at least one processor for system functions, but individual scenarios may vary.

  • Hardware Buffer. You also learned that a small Hardware Buffer size helps minimize monitoring latency. But a larger buffer becomes essential as signal processing demands increase, so when mixing you’ll want it set as high as possible. Since there’s a possibility of inconsistent automation and MIDI timing at higher settings, you should experiment with your system to identify the optimal mix configuration.

    The Pro Tools 10 Playback Engine dialog. Note that Hardware Buffer and RTAS Processor options vary based on your host computer and Pro Tools hardware.

    The version 12 Playback Engine dialog.

    Consider displaying the System Usage window to get an idea of how much CPU power is being used:

    Session with 25 EQ plug-ins

    Session with 25 EQ and 25 compressor plug-ins

    Session with 25 EQ, 25 compressor, and 25 reverb plug-ins

    At some point, the CPU might not be able to handle excessive signal processing. If the buffer size is already maxed out, the only solution is to reduce the number of plug-ins (assuming we’re fond of the tracks and can’t afford a new computer!).

Also note that bypassed plug-ins use as much CPU power as when processing signals. If you have no immediate use for certain plug-ins but don’t want to remove them from a session, it’s better to deactivate rather than bypass. (Control settings and automation you may utilize later are preserved.) Command-Control-click (Mac OS) or Control-Start-click (Windows) on a plug-in (or hardware) insert to deactivate or reactivate it.

First, how can you tell if the processing on a channel is causing latency? Phase cancellation might not be apparent if the volume level is low, so it’s a good idea to check the channel status directly. To do this in Pro Tools 10, just Command-click (Mac OS) or Control-click (Windows) on the Audio Volume indicator below any fader in the Mix window to cycle through its three displays (fader level, peak track level, and total track latency). If using version 11 or later, the Audio Volume indicator is the left display below the fader, and you can toggle between fader level and latency.

Track latency can also be viewed when delay compensation (discussed below) is active by selecting the Delay Compensation option in the Mix Window View.

Total track latency displayed in Pro Tools 10.

Latency displayed in Pro Tools 12.

Latency is measured in samples, so in the example above the delay will be approximately 1.5 milliseconds assuming a sample rate of 44.1 kHz (64 ÷ 44,100). Depending upon the plug-ins being used, latency can be significant. In the next example, we’ll activate multiple inserts on a channel. Of the five inserts, all but the first introduce latency. Note how the total latency increases as we activate the plug-ins one-by-one.

Fortunately, this is readily mitigated. Although there are a few methods for dealing with latency, the easiest is to utilize Automatic Delay Compensation. ADC does all of the work for you, adjusting every track’s total delay as needed and updating these settings whenever plug-in instances are modified. It also compensates for the delays associated with busses and sends. It’s theoretically possible you’ll still need to use manual adjustments on occasion, since there’s a limit to the total delay compensation available. However, this will rarely—if ever—be the case, so delay compensation will usually be quick and easy. Here’s how it works:

If you want to use an old-school solution for latency, the following should be a workable solution:

  1. Identify the channels that may need intervention, based on the scenarios we’ve discussed.

  2. Identify the total latency on each channel, and note which channel has the highest latency.

  3. Instantiate the TimeAdjuster plug-in on each affected channel other than the channel with the maximum latency. (Use the small, medium, or long depending upon the amount of correction needed.)

  4. Set the TimeAdjuster delay on each channel so that the total latency matches the delay on the channel with the maximum latency.

  5. Don’t forget to update the TimeAdjuster plug-in settings if you make a change in plug-in usage that alters the latency on the affected tracks.

This may sound like a hassle, and in fact it’s not the most enjoyable part of mixing. But you shouldn’t have too many instances that require intervention, so won’t need to spend a lot of time dealing with latency. Here’s the basic process in the same session:

Command-Option-click (Mac OS) or Control-Alt-click (Windows) on any level display to toggle to the delay time for all tracks. After we add the first adjustment, we can Option-click and drag (Mac; Alt using Windows) on the plug-in nameplate to duplicate it on another track.

Note that the above example was made using Pro Tools 10; the process should be equivalent in version 11, but the TimeAdjuster plug-in doesn’t seem to affect the latency indicator!