Foundation for Musicians and Songwriters

Representing the artist that would otherwise not have a voice

Setting Avid ProTools up for Mixing

We thought it would be good to review options for configuring an effective and inspiring mixing environment. We’ll pull together certain techniques that the Pro’s use, consider new ways to utilize some tools, and explore additional Pro Tools features that can significantly enhance the mixing process.

Anyone that has mixed before has seen how beefing up a system can facilitate taking on larger, more complex projects. Nowhere is this more imperative than when mixing. You just can’t get enough of certain items:

  • Control surface features. Mixing is all about making repeated control adjustments until you’ve gotten parameters just right. How do you make these adjustments? Perhaps largely using the graphical editing tools we explored last week, but everything else you do involves setting linear fader levels, rotary pot positions, and other types of controls. Control surfaces make these actions considerably easier, so it won’t be a surprise if you use these features more when mixing that at any other stage of the production process.

  • Screen real estate. With or without a control surface, mixing benefits from as much display capacity as possible. Besides having access to both the Mix and Edit windows, you’ll often want to show multiple plug-ins as well as other windows. Larger monitors are always good, but a second display is even better. 

  • Processing power and RAM. The amount of number crunching going on within a mix can be staggering. Unless you’re making minimal use of signal processing, faster multi-processor or multi-core hosts for native systems—or additional DSP cards with an HD rig—will enable you to manage far more involved mixes. Likewise, additional RAM will boost general performance and enable the use of more plug-ins, particularly processor hogs like convolution reverbs.

  • Plug-ins. Of course, all of this processing power won’t help if you don’t have much in the way of plug-ins. The standard suite of Pro Tools plug-ins is a nice start, but you’ve already seen how additional Avid as well as third-party products can dramatically enhance your capabilities. For mixing, you may want to start by looking at additional ambience and effects processors, since these are not the strongest elements of the basic Pro Tools collection.

Although generally speaking most mixing beginners use systems with a single monitor with and without a basic control surface, you can imagine that display options can be much more dramatic with expanded systems. However, if you are fortunate enough to have two monitors and do not have a control surface, you’ll likely want to dedicate one monitor for the Mix window and the other for the Edit window.  If you prefer to do most of your work using the Edit window, you might toggle between Edit and Mix on your main monitor and reserve the second for plug-ins as well as other frequently used windows (Memory Locations, Automation, etc.). With two monitors and a control surface, there’s rarely any reason to access the Mix window. Maximize the Edit window on the main monitor, and use the second as described above.

When using a single monitor, how can you optimize the display? Consider these options for the Edit window:

  • View the left (tracks/groups) column. Though you can use Groups List Keyboard Focus mode (introduced in the next topic) to enable and disable groups, you’ll miss some nice features without access to the Groups List.

  • Hide the Clips List. Yes, there are commands in the Clips List popup menu you might need when mixing, but some have shortcut equivalents, and much of the time these are not necessary.

  • Select inserts, sends, and I/O view options. The I/O column allows you to bring up Output windows and use quick shortcuts to access automation playlists, so this is a good option when you’re mixing primarily with the Edit window.

  • Show the Automation and Memory Location windows. These may be accessed frequently, so consider dedicating a typical area for them.

  • Hide the Transport window. At this stage, it just gets in the way, and you can display transport controls in the main Edit window toolbar and/or set the numeric keypad to Transport Mode for control of everything you need.

  • View one plug-in at a time. Though it can be really convenient to have more than one plug-in window on screen, they will quickly obscure the rest of the session. Alternatively, use the commands introduced below to facilitate working with multiple floating windows.

Your base display might look like this:

However, it is sometimes very useful to include multiple floating windows in your screen layout. For example, you might want to display several plug-in windows in order to compare EQ settings on various channels, or utilize a series of output windows to provide mixer-like functionality while maintaining the basic Edit window perspective. Some users don’t bother with such configurations, since it takes a bit of effort to open and close all of the windows. However, there are a couple of newer Pro Tools features that greatly facilitate these scenarios:

  • Hide floating windows. The command Window > Hide All Floating Windows makes it much easier to utilize multiple windows. Rather than closing and reopening floating windows manually—a minor but annoying hassle—you can simply hide them temporarily. You can also use the shortcut Command-Option-Control+W (Mac OS) or Control-Alt-Start+W (Windows).

  • Create custom Window Configurations. A handy part of the Pro Tools feature set is the ability to name, store, and recall the configuration of windows in a session as well as the view options of the primary windows.

Color coding is the type of feature that might seem trivial at first glance. However, it can really enhance the usability of sessions by providing an additional dimension of feedback that helps you differentiate repeated elements with similar features.

Three aspects of the Edit and Mix window displays can be customized with color coding preferences:

  • Color bars that appear in several locations

    • above and below each channel strip in the Mix window.

    • to the left of each track in the Edit window track area.

    • to the left of each track name in the Tracks List.

    • to the left of each group name in the Groups List.

  • Track area display in the Edit window

    • clip shading in Blocks or Waveform views.

    • waveform color when viewing automation playlists.

  • Shading between markers in the Markers ruler.

Note that of these options only the Track Color view affects the Mix window display.

Color coding selections are made in the Display preferences tab. Track Color Coding settings apply to all color bars, and Clip Color Coding settings determine clip and waveform shading. Marker ruler colors are enabled via the first checkbox, or when choosing the Marker Locations option for clips.

How important is the brightness and contrast of the Pro Tools interface? Perhaps more than you’d think. Consider the dramatic changes made to the graphical user interface way back when version 8 was released:

A session opened in Pro Tools 7.4

The same session as of Pro Tools 8.

The difference is not subtle. If you’re like most people, you either love the updated interface… or can’t stand it! At that time, many who preferred the “classic” version liked the bright display and contrast that could make it easier to differentiate on-screen elements. Some who preferred the revised version found it more comfortable for viewing, especially during long sessions.

What do you think? Regardless, there are additional display options that allow you to modify the standard grey background if you find it unappealing. The Color Palette window can be used to customize interface colors, and in particular alter the shading of channel strips.

The Brightness slider can make a big difference for background contrast. You also might want to experiment with the Apply to Channel Strip button shown above, along with the Saturation slider, to shade channel backgrounds according to the active color coding preference.

If you’re consistently well organized, carefully manage your assets from the very first tracks and clips in a session onwards, and follow recommended procedures for recording, overdubbing, and editing, you can skip this section. On second thought, even the most rigorous and diligent engineers should still read on. This is a good time to review various ways to prepare a session for mixing, and there’s a good chance you haven’t tended to at least a couple. Furthermore, you may inherit a project from another engineer and find yourself forced to deal with someone’s mess, or get a gig remixing an existing record. Despite your best intentions, you nonetheless may need to deal with the following elements of a session prior to mixing:

  • Rename tracks. Don’t be surprised when you’re hired to mix a session and track names are obscure and unrecognizable. Restrict names to 8 characters or fewer so that certain control surface LED scribble strips won’t truncate them.

  • Add markers. The complete song form should be clearly and precisely outlined so that every major transition is easily located. This will also facilitate selecting sections of a song in order to create snapshot automation.

  • Create selection presets. It’s also handy to define preset selections for frequently accessed sections of a song.

  • Construct a beat map. Even if you didn’t do this for editing, a beat map can also come in handy when mixing for techniques such as synchronizing plug-ins with the performance.

  • Create display presets. Memory locations can also be used to store detailed display configurations with customized track show/hide status, height, group enables, zoom settings, and window configurations. For example, you might have a setup for submixing background vocals that includes displaying certain tracks with specific heights and zoom settings. Such presets generally should not have time properties designated. 

  • Define groups. This is a powerful feature that facilitates linking controls on related tracks. We’ll address it in detail in the next topic.


  • Clean up. The track area in particular can get increasingly messier as a production progresses, and is often at its worst when mixing commences. We’ll discuss how to approach such problems on the next page.

  • Print Instrument tracks. You’ll probably need as much processing power as possible for plug-ins when mixing. Virtual instruments typically demand an inordinate percentage of available resources, so you should consider bouncing them to Audio tracks. 

In theory, your tracks and edits will be clean as a whistle when it’s time to mix. In reality, that’s not always the case. Although you’ve presumably sliced and diced the playlists already, some rough edges may remain. Try to address the following prior to mixing:

  • Trim tops and tails. Although it’s possible to keep your clips intact and automate mutes in order to control where they begin and end, it’s a much better idea to trim back clips. You’ll save processing power for more important tasks, and there’s no risk of inaccurate automation timing.

  • Clear other excess. Similarly, you should delete unwanted audio within larger clips. Done properly, your playlists will contain concise clips where tracks play, and will be clear elsewhere.

  • Add fade-ins and -outs. If you trimmed clips as close as possible to the desired audio, it’s possible you’ll need a short fade to smooth the transition. You might want to trim up the entire session and then apply batch fades to make this quick and easy.

  • Check existing edits. It’s possible that some of your crossfades did not end up as clean as you’d like. Verify the integrity of these, or go through a single batch process as above.

  • Consolidate. We discussed consolidating audio two weeks ago, but you sometimes won’t do this until ready to mix. Since consolidating combines all of your edits into a single clip, you may prefer to wait until you’re certain that no further changes will be needed. Consolidation can be useful prior to mixing to reduce the disk access load in sessions with high track counts and edit density. 

When mixing, you’ll often need to make an identical adjustment on multiple tracks simultaneously. Perhaps you want to raise all of the guitar tracks—whether you have 2 or 20—by 3 dB. Or mute the entire drum kit for two beats. Or trim the tails of a set of background vocals. Or… well, do almost anything you’d do on a single track.

There are two ways to approach these scenarios that don’t involve painstakingly making the exact same moves on each track. Grouping can make your work much easier in all phases of the production process, but especially when mixing.

We’ll look at a variety of considerations pertaining to implementing and using Pro Tools grouping features, including significant new features, enhancements, and changes introduced in recent versions. Complete the reading below before continuing.

General Characteristics of Groups

Fundamentally, grouping seems like a simple enough concept. However, a closer look will reveal some fairly sophisticated and versatile capabilities. We’ll start by identifying the general characteristics of Pro Tools grouping features before exploring how they work in your sessions:

  • Recent versions do more. Grouping in older Pro Tools versions was a useful but basic feature. It’s now both useful and extremely powerful. Noteworthy enhancements include:

    • more groups (104, in 4 banks of 26)

    • enhanced Create Group dialog with additional options

      As of version 12 the Create Group dialog supports both global as well as individual group attributes.

    • no need to select tracks prior to invoking the New Group command

    • no longer necessary to overwrite existing groups to modify their specifications

    • revised Groups List popup menu

    • ability to specify which controls are grouped

  • Basic grouping and VCA-style grouping are different. When using the functions discussed in this topic, a control change on a grouped control on any track results in the same change to all group members. There’s another option—VCA-style grouping—in which multiple tracks can be controlled by a remote master, but the controls on the individual channels only affect a single track. (Requires either Pro Tools HD or version 12 or higher software.)

  • Fader (or other control) levels on grouped tracks maintain the same relative positions when adjusted. For example, if you raise a fader on one group member such that others top out, the relative positions are restored when you lower the levels.

  • Groups can be specified for edit functions, mix controls, or both. An Edit group only affects specific edit functions:
    • track view
    • track height

    • track timebase

    • editing functions such as selecting or trimming multiple tracks

    • automation functions such as inserting or modifying data on multiple tracks

 Mix groups can include fader, mute, and other controls (many more with Pro Tools HD). Edit groups do not include these controls, even when utilizing Edit window channel controls.
  • Groups can also be nested. You can define and use multiple groups with overlapping members. The Group ID for any channel appearing in two or more active groups is displayed in upper case.

Here, we’ll quickly review the steps required to create a Group in ProTools.

  1. Use any of the following methods to access the Create Group dialog:

    1. Invoke the command from the Track menu.


    2. Invoke the command from the Mix Groups list or Edit Groups list popup menu.


    3. Use the shortcut Command+G (Mac OS) or Control+G (Windows)


      NOTE: With previous versions of Pro Tools, it was necessary to select all tracks to be grouped prior to invoking the New Group command. This is (conveniently) no longer the case.

  1. Enter an appropriate name and select an ID.

    NOTE: You don’t have to stick with the default consecutive IDs for your groups. It can be helpful to use letters that relate to the group members (d for drums, for example), or come up with a standard configuration you’ll remember in all of your sessions. By doing so, you can facilitate enabling and disabling groups using Groups List Keyboard Focus (described below).

  2. Select the group type. If you’re not sure whether you’ll need the group for edit or mix functions, select both types; you can always modify this later.

  3. Select the attributes that will be linked on Mix group tracks (in addition to the fader level and automation status, which are always linked).

     NOTE: In version 12 and higher, you can also assign the group to an available VCA Master track.
  4. Select the tracks that will be members of the group, using one or more of the following methods: 

    1. To add selected tracks to the group member list, click on Add.

    2. To add selected tracks to the group member list in place of any members currently in the list, click on Replace.

    3. To add tracks from the Available tracks list, select one or more in the list, then click on Add >>.

    NOTE: Press A on the keyboard to add tracks selected in the Available list.
6. Click ok

It’s not uncommon for you to want to modify characteristics of a group. For example, you might record new tracks that are consistent with an existing group, or find that you’d rather not have an Edit group also link track controls. In the past, you’d have to create a new group and overwrite the previous one to effectively modify it. That’s not necessary anymore:

  1. Access the Modify Groups dialog using any of the following methods:

    1. Select Modify Groups in the Edit Groups List or Mix Groups List popup menu.

    2. In the Mix window, click on a track’s Group ID Indicator and select Modify in the popup menu.

    3. Right-click or click and hold on the group name in the Edit Groups List or Mix Groups List, then select Modify in the popup menu. 

  2. Set the group parameters as you would when creating a new group, starting with the group ID.

    1. The Remove button in the Modify Groups dialog provides an easy means for removing one or more tracks from the current group members.

    2. The handy—but dangerous—All group (discussed shortly) can be modified to make it somewhat less dangerous by restricting it to only act as an Edit or Mix group.

Two of the methods for modifying groups also provide a means for deleting a designated group:

  1. In the Mix window, click on a track’s Group ID Indicator and select Delete in the popup menu.

  2. Right-click or click and hold on the group name in the Edit Groups List or Mix Groups List, then select Delete in the popup menu.
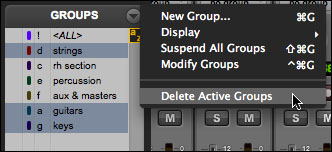
You can also delete all currently active groups with the aptly named Delete Active Groups command in the Edit Groups List or Mix Groups List popup.

NOTE: Deleting groups is not undoable, so be certain you really want to do this. Don’t worry; you’ll be reminded. Also keep in mind that deleting groups leaves the actual tracks intact.

Don’t discount the possibility that a grouped pair of mono tracks might occasionally be more effective than the typical stereo configuration. It’s true that a single stereo track is usually best for two-channel sources such as virtual instruments or stereo miking. However, you’ll sometimes want to treat one side of the pair differently than the other, like using a different plug-in on the left and right channels. In this case, it might be convenient to simply work with mono tracks but group them to easily adjust their general control settings.

In this section, we’ll explore a variety of aspects related to using channel inserts in Pro Tools sessions. We’ll start by considering several general insert issues, including the potential for misusing plug-ins, insert signal flow in applicable tracks, and the distinctions between multi-mono and multi-channel formats. We’ll review basic methods for instantiating inserts, and throw in a few new tricks for simultaneously adding or deleting multiple inserts, as well as moving and copying them. We’ll look at several options for organizing plug-in menu listings, including basic preferences, custom plug-in favorites, and default EQ and compressor settings. We’ll identify the performance issues relevant to heavy use of plug-ins, and suggest appropriate settings for optimizing plug-in capabilities in mix sessions. We’ll revisit the concept of plug-in latency discussed earlier this week, and see how to mitigate the potential problems of phase cancellation. Finally, we’ll survey a variety of specific techniques that will be helpful when utilizing inserts. Complete the reading below, and then we’ll get started.

Inserts and real-time plug-ins are not equivalent. It’s easy to think of these as identical, since all real-time plug-ins are instantiated as channel inserts. However, hardware I/O channels can also be utilized for inserts, and this has nothing to do with internal signal processing. We’ll be dealing with plug-ins almost exclusively here and will use the terms somewhat interchangeably, but keep in mind that there is an alternative.
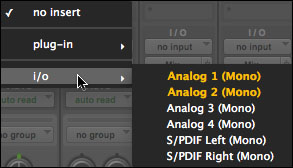
Scroll past the plug-in submenu when instantiating an insert to access another submenu with hardware I/O options.


If your audio interface only supports two inputs and outputs, it won’t be possible to use hardware inserts. (You’d need at least one unused input and output channel, and the main stereo monitor outputs would preempt any others.) 
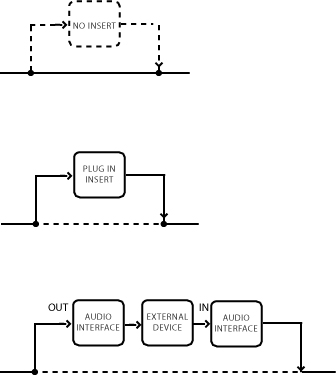
When a plug-in is inserted in a channel, it interrupts the normal signal flow and routes audio through the plug-in software. When an I/O channel is inserted in the signal flow, audio is routed to the designated audio interface output channel, through an external device, and back through the corresponding audio interface input channel.

Messing around with signal processing can be one of the most enjoyable aspects of production. But beware: just like with anything else, too much of a good thing can quickly cease being so good. Novice engineers often fall into one or more of these classic traps: 

  • Overprocessing. It often seems like it’s easier to crank up the controls of an on-screen device as opposed to actual hardware. There’s something about turning a pot all the way up that breeds caution more than clicking and dragging.

  • Too many plug-ins. There’s rarely a good reason to use three, four, or even five inserts across the board. Nonetheless, some engineers appear to believe that more is better. It’s not.

  • Poor gain staging. In theory plug-ins can be overloaded, and unlike classic analog gear they won’t sound good when doing so. Fortunately, the 32-bit floating point processing used by AAX plug-ins provides essentially unlimited headroom, so this is no longer a critical issue. Still, I’d pay attention to gain staging—at some point, even if only with regards to hardware inputs and outputs, you’ll have to stay within proper operating limits.

The channel signal flow for Audio and other track types is not complex compared to traditional consoles, but you still need to be aware of how it works. In Audio, Auxiliary, and Instrument tracks, inserts are always pre-fader and appear in series beginning with Insert A. Keep in mind the order of insert slots when setting up signal processing. If, for example, you want your EQ to follow a compressor, you don’t want it placed in the first slot. 

Five inserts are shown here, but all Pro Tools audio-based tracks provide a second bank with five more.

Once instantiated, insert order can usually—but not always—be changed. If you invoke a plug-in with, say, a mono input and stereo output, it cannot be placed ahead of a plug-in with a mono input.

You’ve probably noticed the options of both of multi-mono and multi-channel formats when instantiating plug-ins on stereo tracks. What’s the difference?

  • Multi-mono plug-ins are linked pairs (or larger configurations with surround mixing) of independent processors. The controls can also be unlinked to provide independent adjustment of each channel.

  • Multi-channel plug-ins act like single processors regardless of their input and output configuration. Often, the processing itself is linked. For example, reverb effects may be based on a complex combination of both input channels, and multi-channel dynamics tools generally link gain reduction in both channels to be triggered by an input on either. 

You’re already familiar with how to instantiate a plug-in insert using the ten Insert Selector buttons on each track in the Mix and Edit windows. We’ve also demonstrated how the Plug-in and Insert Position Selector buttons in plug-in windows can be used for these purposes.

Within a channel, just click on the plug-in Insert selector for the desired slot.

Within a plug-in window, first select the insert slot.

Then instantiate a plug-in.

The same controls are used to remove instantiated plug-ins.

no insert

These methods can be extended to instantiate or remove multiple plug-ins simultaneously:

  1. To instantiate or remove the same plug-in on every visible track, press and hold the Option key (Mac OS) or Alt key (Windows) while instantiating (or removing) a plug-in.

    NOTE: Why doesn’t this technique apply to the second channel? It’s a stereo track, and only plug-ins with the same format will be affected. Note that you can use the Plug-in Selector on any track to both instantiate and remove.

  1. To instantiate or remove the same plug-in on every selected track, press and hold Option-Shift (Mac OS) or Alt-Shift (Windows) while instantiating (or removing) a plug-in.

  2. To move an insert to a different position, click and drag the insert to the desired slot. You can move an insert to a different slot on the same channel or to a different channel, but the format must match. If you drag the insert to a slot that already contains one, it is replaced.

  3. To copy a plug-in to a different slot, press and hold the Option key (Mac OS) or Alt key (Windows) while dragging the plug-in to that slot. The duplicate plug-in will have identical settings as well as any applicable plug-in automation.

As you build up your plug-in collection, the process of instantiating can get awkward. Popup menus become unwieldy when the number of items is lengthy, and it’s easy to miss your target when scrolling through multiple submenus. Fortunately, there are a few simple Pro Tools features that can improve the process:

  1. Menu Organization. You can set the preference that determines how the plug-in menu is organized to best suit your needs.

    Menu Organization

    The Flat List is not going to help matters much unless you absolutely despise popup submenus:

    With the Flat List display, the popup length may exceed your screen height!

    Organizing by Category is the default option:

    Organizing by Manufacturer might work for you, but in many cases you’ll end up with a submenu imbalance that won’t make the process any easier:

    Note that the Avid submenu includes Melodyne and Reason, since the plug-in itself is just the ReWire link to external software.

    The Category and Manufacturer option simply provides both organization systems, which presumably is useful under certain circumstances…

  2. Plug-in favorites. If the plug-in menu organization preferences leave you wanting easier options, fear not—there are two other handy features. You can add your most frequently used selections to the root level of the plug-in submenu by pressing and holding the Command key (Mac OS) or Control key (Windows) while selecting the desired favorite.

  3. Default EQ and Dynamics. Even more convenient is the option to place default EQ and dynamic plug-ins as the first two choices in the root level of the insert popup menu, making them incredibly easy to instantiate. Set the default choices in the Mixing preferences tab.

    You can choose any installed EQ and dynamics plug-ins for default choices.

    Default processors are always the first selections in the insert pop-up menu.

Many of the issues we considered for recording are also applicable to the mixing process:

  • Optimize the host computer’s operating system, and disable unnecessary features.

  • Refrain from running other applications in the background, unless they are related to your project (i.e. external VIs such as Reason).

  • Prior to Pro Tools 11, set the Pro Tools CPU Usage Limit as high as possible, while allowing sufficient resources for basic OS tasks such as screen redraws as well as necessary background applications. (Accessed via the Playback Engine dialog.)

However, certain settings that are appropriate for recording must be approached differently for mixing:
  • Host Processors. Prior to Pro Tools 11, with multiprocessor and multi-core hosts you can dedicate some or all of the additional CPU power to real-time plug-ins. This is not necessary when recording, since you’ll generally want to minimize plug-in use to avoid monitoring latency. Mixing is an entirely different story. Try to reserve as much processing power for native plug-ins as is feasible without sacrificing OS performance or automation accuracy. Typically, you’ll reserve at least one processor for system functions, but individual scenarios may vary.

  • Hardware Buffer. You also learned that a small Hardware Buffer size helps minimize monitoring latency. But a larger buffer becomes essential as signal processing demands increase, so when mixing you’ll want it set as high as possible. Since there’s a possibility of inconsistent automation and MIDI timing at higher settings, you should experiment with your system to identify the optimal mix configuration.

    The Pro Tools 10 Playback Engine dialog. Note that Hardware Buffer and RTAS Processor options vary based on your host computer and Pro Tools hardware.

    The version 12 Playback Engine dialog.

    Consider displaying the System Usage window to get an idea of how much CPU power is being used:

    Session with 25 EQ plug-ins

    Session with 25 EQ and 25 compressor plug-ins

    Session with 25 EQ, 25 compressor, and 25 reverb plug-ins

    At some point, the CPU might not be able to handle excessive signal processing. If the buffer size is already maxed out, the only solution is to reduce the number of plug-ins (assuming we’re fond of the tracks and can’t afford a new computer!).

Also note that bypassed plug-ins use as much CPU power as when processing signals. If you have no immediate use for certain plug-ins but don’t want to remove them from a session, it’s better to deactivate rather than bypass. (Control settings and automation you may utilize later are preserved.) Command-Control-click (Mac OS) or Control-Start-click (Windows) on a plug-in (or hardware) insert to deactivate or reactivate it.

First, how can you tell if the processing on a channel is causing latency? Phase cancellation might not be apparent if the volume level is low, so it’s a good idea to check the channel status directly. To do this in Pro Tools 10, just Command-click (Mac OS) or Control-click (Windows) on the Audio Volume indicator below any fader in the Mix window to cycle through its three displays (fader level, peak track level, and total track latency). If using version 11 or later, the Audio Volume indicator is the left display below the fader, and you can toggle between fader level and latency.

Track latency can also be viewed when delay compensation (discussed below) is active by selecting the Delay Compensation option in the Mix Window View.

Total track latency displayed in Pro Tools 10.

Latency displayed in Pro Tools 12.

Latency is measured in samples, so in the example above the delay will be approximately 1.5 milliseconds assuming a sample rate of 44.1 kHz (64 ÷ 44,100). Depending upon the plug-ins being used, latency can be significant. In the next example, we’ll activate multiple inserts on a channel. Of the five inserts, all but the first introduce latency. Note how the total latency increases as we activate the plug-ins one-by-one.

Fortunately, this is readily mitigated. Although there are a few methods for dealing with latency, the easiest is to utilize Automatic Delay Compensation. ADC does all of the work for you, adjusting every track’s total delay as needed and updating these settings whenever plug-in instances are modified. It also compensates for the delays associated with busses and sends. It’s theoretically possible you’ll still need to use manual adjustments on occasion, since there’s a limit to the total delay compensation available. However, this will rarely—if ever—be the case, so delay compensation will usually be quick and easy. Here’s how it works:

If you want to use an old-school solution for latency, the following should be a workable solution:

  1. Identify the channels that may need intervention, based on the scenarios we’ve discussed.

  2. Identify the total latency on each channel, and note which channel has the highest latency.

  3. Instantiate the TimeAdjuster plug-in on each affected channel other than the channel with the maximum latency. (Use the small, medium, or long depending upon the amount of correction needed.)

  4. Set the TimeAdjuster delay on each channel so that the total latency matches the delay on the channel with the maximum latency.

  5. Don’t forget to update the TimeAdjuster plug-in settings if you make a change in plug-in usage that alters the latency on the affected tracks.

This may sound like a hassle, and in fact it’s not the most enjoyable part of mixing. But you shouldn’t have too many instances that require intervention, so won’t need to spend a lot of time dealing with latency. Here’s the basic process in the same session:

Command-Option-click (Mac OS) or Control-Alt-click (Windows) on any level display to toggle to the delay time for all tracks. After we add the first adjustment, we can Option-click and drag (Mac; Alt using Windows) on the plug-in nameplate to duplicate it on another track.

Note that the above example was made using Pro Tools 10; the process should be equivalent in version 11, but the TimeAdjuster plug-in doesn’t seem to affect the latency indicator!

Taylor Swift’s ‘Look What You Made Me Do’: A Complete Timeline

Last week was a big one for Taylor Swift. From swiping her social media accounts clean on Aug. 18 to shattering records across the board with her newest single “Look What You Made Me Do,” the evolving pop star’s road to Reputation has been a mix of suspense, excitement, and controversy.

With such a jam-packed 10-day period for one superstar — and the potential for another No. 1 Taylor Swift hit — Billboard wanted to lay out everything that’s happened with Swift in the midst of her latest release. Find a complete timeline below.

August 18: Taylor Swift wipes her social media accounts clean, with all photos and posts on her Twitter, Instagram, and Tumblr deleted. The singer also deletes the avatar picture and header for her Twitter and Facebook pages, which she later replaces with promotional pictures for Reputation.

It’s also on this day that a visit to her official website reveals a blank, black screen in place of her usual promotional and tour information. Fans note that it was exactly three years ago on this date that Swift released her single “Shake It Off” and announced the release of her fifth album 1989, igniting further speculation that new music was on the way.

August 21-23: Over the span of three consecutive days, Swift begins posting ominous short video clips of snakes to her social media accounts, with none of the posts offering more information with a caption. Fans immediately find the snakes to be an allusion to the Kardashian-Swift feud that became public on National Snake Day (July 17) last year. The initial post included only an image of a snake-like tail, the second featuring a coiled snake body, and the third finally revealing the animal’s face.

August 23: After more than a week of mysterious signals, Swift officially announces that the first single from her upcoming album will be released the following night, simultaneously announcing the official release date to be Nov. 10. Her Instagram posts reveal the grungy cover art for her album.

August 24: Kim Kardashian seemingly blocks the snake emoji from her Instagram accounts as Swift’s impending release triggered snake-filled comments on her tweets and Instagram posts.

August 25:  “Look What You Made Me Do,” the first single off of Reputation, is released along with an animated lyric music video. The lyric video, which parodies the animation style of the opening credits for Ryan Murphy’s FX anthology Feud: Bette and Joan, breaks the record for the most-watched lyric video within 24 hours of its release. The video breaks the record previously held by The Chainsmokers and Coldplay for “Something Like This,” with an initial 19 million views. The video has now amassed more than 48 million views at press time.

August 27: Swift debuts the official music video for “Look What You Made Me Do” on the 2017 MTV Video Music Awards, which was immediately released on YouTube after its premiere. Following the popularity of the earlier-released lyric video, the music video breaks the record for the most watched music video within 24 hours of its release, garnering 43.2 million views in its first day — surpassing Adele’s 27.7 million with her “Hello” video. The visual has since been watched almost 60 million times as of press time.

August 28: Since its release, the single lands itself at No. 77 on Billboard’s Hot 100 (dated Sept. 9) after only 3 days of air-play. However, it’s predicted to soar to No. 1on next week’s Hot 100.


Music Industry Will Hit $41 Billion By 2030

A Goldman Sachs analyst forecasted that streaming will account for $34 billion of the total revenues.

The global recorded music industry will grow into a nearly $41 billion behemoth by 2030, thanks largely to the growth of streaming, according to Goldman Sachs analyst Lisa Yang and her team.

The Goldman Sachs analyst further predicts that streaming will account for $34 billion of that, of which $28 billion will come from paid subscription while $6 billion will come from ad-supported streaming services. She predicts that another $4 billon will come from performance rights, synchronization will be $500 million, physical and downloads $700 million and other come in at $1.2 billion.

The report further states that thanks to the explosion of streaming, the Universal Music Group and Sony Music Entertainment should carry hefty valuations. Both companies are themselves not listed in the stock market, but the shares of their parents, respectively Vivendi and Sony. Corp., are publicly traded.

Looking at the Universal Music Group, Yang assigns a valuation of 19.5 billion euros, which according to the OandA website, converts to $23.3 billion; while she says that her estimates for Sony Music Entertainment’s performance suggests a valuation of 2.16 trillion yen or $19.8 billion.

Looking at UMG, Yang breaks out her estimates for that company, which helped derive its valuation. In the Goldman Sachs report, she estimates UMG’s revenue at 12.6 billion euros  ($15.05 billion) by 2030 (that’s twice its current level), of which 1.58 billion euros ($1.89 billion) will be from publishing; 9.3 billion euros ($11.11 billion) from streaming; 1.1 billion euros $1.3 billion) from artist services and music licensing; 500 million euros ($597 million) from merchandising and 150 million euros ($179.2 million) from physical and download sales.

In 2016, U.S. recorded music sales were up by double digits for the first time in nearly 20 years to 11.4 percent with $7.65 billion in revenue, according to the RIAA. That was up from $6.87 million in 2015. Although the music business showed signs of a recovery at the half-year mark, the 2016 year-end results show more significant growth, led by streaming revenue. This was the first time since 1998 that the U.S industry experienced a double digit increase in overall revenue.

How Streaming IS Changing the Sound of Pop Music

In 2015 the U.S. music industry made more money from streaming than from CDs or digital downloads. Streaming platforms now boast more than 100 million paying subscribers worldwide. And the popularity of these services continues to rise, with more than one trillion plays logged last year alone. The times, they are a-changin’.

In case you haven’t noticed, the way we consume music is shifting—and that is impacting artists. (We’ve all seen the pitiful royalty statements and scathing op-eds. And who could forget Taylor Swift’s epic 2015 fallout with Apple Music? But amidst all this talk, no one’s mentioned how the rise of streaming will affect the actual sound of pop music. Streaming will change not only the way pop music is consumed but also the way it’s created. This shift will likely redefine what future hit records sound like. Surprised? You shouldn’t be. There’s always been a close-knit relationship between music, medium, and distribution. For proof, just look to the past.

Built for Radio

In the 1960s, Motown built records for radio. Short songs allowed for the regular interjection of ads, and long intros gave DJs the freedom to talk over tracks. During the 1980s, the dawn of the CD gave way to longer-form content. The length of an average album increased from 40 minutes to well more than an hour. And since it was no longer important to maintain the integrity of vinyl grooves, records started sporting more low end and louder levels. Is it any surprise that hip-hop emerged as a dominant genre during this time? During the 2000s, Apple’s decision to unbundle the album and offer single-track downloads on iTunes shifted the trajectory of the music industry once again. After an album-oriented trend that lasted decades, singles once again became the primary focus.

Along the way, our listening habits evolved too. As on-demand, à-la-carte platforms like iTunes and Spotify emerged, attention spans narrowed. Even I can’t remember the last time I listened to an album from start to finish. Today, music discovery is like mining for gold. We cherry-pick the best songs off albums, curate playlists of our favorite tracks, and ignore the rest. And once we start listening, we’re more impatient than ever. In fact, there’s nearly a 50-percent chance you’ll skip a song before it’s over. Why suffer through a dull bridge, an uninspired outro, or your favorite artist’s “deep cuts?” You’ve got places to be!

Today’s music makers have evolved to serve this ever-changing audience. As long-form content has given way to singles, concept albums have become relics of yesteryear. Albums are now more likely to serve as repositories for singles. And while we may feel nostalgic for iconic albums such as The Dark Side of the Moon, Thriller, and Sgt. Pepper’s Lonely Hearts Club Band, there isn’t much of an incentive to create their modern-day equivalents.

An Emphasis on Sales

However, throughout the history of the music business, the goal has always remained the same: Encourage listeners to purchase records. The music industry as we know it was built to inspire these one-off transactions, and the traditional pop music-making process evolved to follow suit. Infectious, hook-heavy records were crafted to drive listeners to checkout aisles. The biggest hits seemed inescapable for a month or two, but often disappeared as quickly as they emerged. But as far as the music industry was concerned, this was irrelevant. Once a purchase was made, it didn’t matter whether a record was listened to or not. As long as people bought the CD or downloaded the song, labels were happy.

But streaming has completely changed the game. For the first time, financial success is no longer based on onetime sales, but rather on ongoing play. The more a track is played, the bigger the payout. The implications of this shift are massive. In fact, it’s likely to disrupt the entire music business yet again.

On streaming platforms, flash-in-the-pan tracks that burn bright and fade fast are less lucrative than ever. Current per-stream payouts are nothing to write home about, and these tracks won’t stick around long enough to produce meaningful returns. But payouts will continue to rise, and future plays will be worth much more than they are today. And so the most profitable pop songs will burrow their way into the hearts of listeners, inspiring millions of streams for years to come. In fact, the biggest hits may even increase in value as time goes on.

This shift introduces a powerful new incentive to foster deeper, longer-lasting relationships with listeners. While tracks still need to be hook-laden enough to inspire an immediate connection, they must also be worth listening to hundreds, if not thousands of times. Gone are the days when an artist could stuff an album with filler and rely on the strength of a single to drive sales. Today, there’s nowhere to hide. Songs are evaluated on an individual basis, and their success is determined by merit alone. Artists with the ability to master the long game will win. One-hit-wonders won’t stand a chance.

Loudness War Truce

Evolution in streaming technology will also affect the sound of pop music. For example, most streaming platforms now automatically adjust the volume of different tracks so they play back at an equal level. This seemingly inconsequential feature will likely end a decades-long arms race known as the “loudness war,” where artists and labels compete to release the loudest records. Without any incentive to crush tracks, records will be mixed and mastered at much more conservative levels. And this means they’ll have more punch, impact, and dynamics—and sound better!

But what will the pop hits of the future actually sound like? We can only guess. As terrestrial radio continues to become less relevant, arrangements and song structures will likely become more fluid. New, innovative mediums may even emerge. Who says a recording has to offer the same experience with every play? What if tracks evolved over time? What if, after 100 plays, a bonus verse emerged? As play count becomes a dominant metric for measuring the success of tracks, ideas like these are ripe for exploration.

And the impact of streaming will extend far beyond the music-making process. It will have a profound effect on the way music is marketed and promoted as well. In a world where a sale is no longer the goal, there’s less of a need to build up hype before an album’s release. In fact, some artists are already abandoning traditional album releases entirely. Beyoncé dropped her last two albums without any prior promotion whatsoever. As more listeners adopt streaming platforms, artists will need to find new ways to foster longer-lasting, more consistent levels of engagement with their audience.

If any of this leaves you feeling discouraged or intimidated, keep your chin up. I’m optimistic about the impact streaming will ultimately have on the music industry. I believe it will usher in a new era of artistic innovation, and foster deeper, closer connections between artists and their listeners. And some things will always remain the same. Exceptional artists with something unique and special to say will stay in high demand. Great songs will still rise to the top. But one thing’s for sure—as streaming becomes the dominant platform for music consumption, the sound of pop music will undoubtedly change. Will you change with it?


Prince’s Estate Signs With Universal Music Publishing

Universal Music Publishing Group announced Wednesday (Nov. 2) that it is the exclusive worldwide publishing administrator for Prince’s entire song catalog — released and unreleased — effective immediately. Terms of the deal were not disclosed, although a source tells Billboard it is a “long term agreement.”

According to the announcement, UMPG is “responsible for servicing and administering Prince’s expansive catalog of songs” and will “work closely with the artist’s estate to develop new creative outlets for his music.” Before his death, Prince and his staff managed his publishing catalog, with Peermusic handling back-office administration, after an earlier UMPG contract ended in 2013.

UMPG chairman and CEO Jody Gerson, said to be the company’s key negotiator in the deal, said in a statement, “We’re humbled to be entrusted with Prince’s catalog and I’m grateful to my entire team for their work in making this agreement a reality. With the timelessness and genius of Prince’s music, there are no limits to what we can achieve working with his estate. Prince’s popularity will only continue to grow around the world.”

Lucian Grainge, chairman and CEO of Universal Music Group, said, “I congratulate Jody and her team on this landmark deal. Since joining UMPG as chairman and CEO in 2015, Jody has done a remarkable job at developing and signing some of the most important songwriters and recording artists in contemporary music highlighted by the addition of Prince’s incredible catalog of work.”

Bremer Trust, the court-appointed temporary special administrator of the Prince Rogers Nelson Estate, hired longtime Prince associates Charles Koppelman (who, as head of EMI Records, signed Prince to his first post-Warner Bros. deal in 1996) and L. Londell McMillan (who was the artist’s manager and/or attorney for more than a decade) and as advisers on the musical holdings. They commented in a statement, “We are pleased that UMPG shall once again administer Prince’s music publishing worldwide and assist the estate by giving Prince’s iconic music catalog the proper care and support it deserves. With this major agreement, the estate maintains ownership of Prince’s music, and now legions of fans from around the world will have even greater opportunities to continue to delight in his incomparable songwriting and musical expression.”

Negotiations for the licensing rights to much of Prince’s overall catalog, as well as to four decades’ worth of unreleased material, are ongoing. The advisers are considering multiple offers, McMillan confirmed to Billboard earlier this month.

Prince’s longtime label Warner Bros. announced that it had secured the rights to the first releases since the artist’s death on April 21: a 40-track greatest-hits compilation called Prince 4Ever, out Nov. 22, and a deluxe edition of Purple Raincontaining a full album of unreleased material, out early next year. The albums are likely the first of many to come from the singer’s vast archive of recordings. In the years after Prince’s initial deal with Warner Bros., which spanned from the beginning of his professional career in 1977 to 1996, the artist — who railed against the traditional label system and doggedly (and, at times, dogmatically) insisted on controlling the rights to his own work and likeness — struck many different one-off deals with labels and streaming services, and even returned to Warner Bros. in 2014 for a pair of new albums, and a renegotiation that saw him gaining at least some of the rights to his Warner catalog.

One high-placed source opined to Billboard that the recorded-music deal is “Warner’s to lose,” citing Prince’s long history with the company and the good will fostered by the 2014 deal.

Since his death on April 21, Prince has sold 1.95 million albums and 4.9 million song downloads in the U.S. through the week ending Oct. 6, according to Nielsen Music.

As for performance licensing, Prince withdrew from ASCAP effective Jan. 1 2015, but his music is still available from that PRO for licenses that were in effect as of that date. ASCAP says that some of those licenses-in-effect expire at the end of this year, while others will continue in effect for several years. So whatever PRO signs a deal, will even get the Prince catalog for ASCAP licenses expiring at the end of this year too, like the one with Radio Music Licensing Committee. A source tells Billboard that the estate is still in the process of selecting a PRO and a decision is expected in the coming weeks.

Prince apparently did not leave a will, which has made the management of the estate deeply complicated.

About the Foundation for Musicians and Songwriters

The Foundation for Musicians and Songwriters is an IRS 501c3 Public Charity that is dedicated to helping Musicians and Songwriters develop their careers in the Music Industry.  We do so without taking a penny or rights from the artist we represent.

To Subscribe to our Music News Updates, Click Here

Click to Subscribe to our Newsletter

6 Steps to Streaming Success on Spotify

Whether you like it or not, there’s no denying that the music streaming industry is continuing to grow at a rapid pace. With Spotify recently hitting a new milestone of 30 million subscribers, we think it’s a wise decision for all independent artists and labels to strengthen their presence on the service.

To help, we’ve compiled these six super easy action items that we’re confident will make a difference in your success on Spotify. Try them out!

1. “On air, on Spotify”

If your music is “on air” – meaning on the radio, YouTube, SoundCloud, or anywhere else online — it should be available to stream on Spotify. This way, you’re both monetizing your music and encouraging playlist adds and profile follows for continued listening.

2. Verify your profile

By verifying your profile (similarly to Twitter), you have the ability to directly communicate with your fans and be highlighted with Spotify’s check of approval. These profiles not only show off an artist’s discography but also house your tour dates, merchandise, biography, photos, and allow you to toggle over to view your playlists on your user profile. A verified profile allows you to communicate with your fans within Spotify through the Spotify Social and Discover feeds, and in-­client messaging. Every time a new piece of content is released ­(new single, EP, album), your fans get a push notification, and every time you add tracks to your playlist, all followers of that playlist will get notified.

To sign up for a verified page, simply fill out the Spotify Verification Request form.

3. Use Spotify as a promotional channel

Think of Spotify as a social network that allows you to monetize your own content in a creative, promotional way. On Spotify, you can gain a follower base, which in turn becomes a promotional channel­. Your Spotify followers receive notifications about updates to your content and your listening habits. Sharing your Spotify profile across your artist properties and socials will drive fans to follow you on Spotify, and allow you to engage in conversations with your fans.

Here are some practical ways to grow your Spotify followers:

  • Follow artists you like to help your fans discover the music you’re listening to.
  • Create and share your playlists.
  • Share across external social networks and encourage conversation when sharing (i.e. ask your fans which tracks they’re into).
  • Share single tracks and albums you’re listening to, and ask fans which playlists you should follow.
  • Add Spotify links to YouTube and other video descriptions.
  • Add the Spotify Follow Button to your website to allow fans to follow you in an easy single click without leaving your website.

4. Create quality playlists

Similar to how a DJ would curate a mix for a radio station or club, streaming services use playlists as an easy way to share tracks and promote discovery.

Keep these tips in mind when creating your playlists:

  • Ensure your account is never empty, and that you have at ­least 1­2 public playlists available.
  • Focus on one playlist –­ choose one to maintain, and add to consistently.
  • Adding tracks on a regular basis is key. The more frequent the adds and the bigger the playlist, the better. Each time you update your playlist, it will appear in fans’ Discover feeds, and followers of the playlist will be notified.
  • Share it. Actively clicking “share” ensures you reach your fans. You’ll find the “share” button towards the top of each page, or right click (cmd+click on Mac) any title to copy and paste the link to be shared across other social platforms.
  • Share with messages: Include text when you share to help your story stand out.
  • Listen to music from your Spotify account. You’ll appear in the live ticker feed (on the right side of the Spotify client), and you’ll generate stories through Discover.
  • Add themed playlists. Once you’ve grown one playlist, add more niche, smaller playlists around certain events or themes.

5. Put the Spotify Play Button on your website

Spotify provides a quick and easy embeddable code that you can put on your website so that your fans can listen to your playlists and discography. By putting this Spotify Play Button on your website or Tumblr, your fans can listen to your music while continuing to engage with your site.

To get the button: just right click on the playlist, track or album on Spotify and select “Copy Embed Code.” This copies the link to your clipboard. Then, paste the code into your website and the Spotify Play Button will show up on your site.

6. Track your metrics

Next Big Sound provides free up-to-date analytics for artists. When you log in, you can see your growth in followers, streaming data, and the effects of your social media campaigns. You’ll be able to track how all of these best practices grows your streams and revenue.

Apply to see your Spotify data here, and read this overview for a full breakdown of how to use Next Big Sound.

About the Foundation for Musicians and Songwriters

The Foundation for Musicians and Songwriters is an IRS 501c3 Public Charity that is dedicated to helping Musicians and Songwriters develop their careers in the Music Industry.  We do so without taking a penny or rights from the artist we represent.

To Subscribe to our Music News Updates, Click Here

Click to Subscribe to our Newsletter

Top-10 Tips to get a Professional Sounding Mix

In today’s tech world, everyone that has a computer is expected to produce expert quality projects.  This is somewhat easy when one needs to create a PowerPoint presentation or a Word Document, but it is not so easy when the final product requires unique skills.

It takes years to get to the point to create studio quality albums, but there are key areas to focus on that can make a night and day difference in the sound quality of the final output.  I put together a top-10 list that can help get you thinking like a Music Engineer/Producer:

1. Check the session over before you start

Make sure you have all the parts, esp. if mixing for someone else. You would be surprised how often a part gets forgotten (Check the rough mix too!) & consolidate the files if you can – it makes it easier to “see” what’s going on in a big session, and psychologically it looks neater! It’s a small thing – but when zoomed “out” you will be able to see where everything is, rather than a mass of edits, which obscure the waveforms.

2. Get the timing right

Especially drums –very important that it’s tight if lots of parts are layered. If there is some unintended “Flaming” going on (i.e. transients of 2 snares that don’t start at the same place, or worse kicks! It can sound messy) In the case of kick drums it can make it sound weaker too, which is very often the opposite of why it’s layered with different sounds.

3. Print Virtual Instruments can be useful

Not everything benefits from this, BUT drums do, and it will help you to see if there is any issues with timing. It also stops you fiddling with the samples and sounds, and concentrate on the mix! As it’s a hassle to reprint. It also frees up system resources, if there is a lot of virtual instruments it can suck a lot of computing power, even with today’s systems, and you will be struggling to have enough power to do the mix.

4. Listen Quietly

It will help if you are in a less than ideal acoustic space (if the room is not acoustically treated, it will get worse with more volume!) I have worked in a few weird sounding places! It really helps when you keep the volume down – the more you crank it, the more any issues with acoustics (or lack of) will show up and you will make bad decisions.

5. Subs can be useful

But only if you have quite a large room (Need 12-15 feet in at least one dimension) and your neighbors will not thank you! (Sub’s tend to throw out in all directions, so it often sounds louder than it actually is, away from the speakers)

6. Listen in Mono

It’s hard to do, but very good for balance (check out other mixes, see if you can listen to them in mono – see where things “Sit” and try and work it into your balance). You might find this teaches you more than you think.

7. Be clear on what you – or the client wants

If you are mixing for someone else – ask what they want! It sounds simple but it’s not good making a “banging” mix with hard drums if they want it “Classic & Warm!” LOL ☺ & ask them what they don’t like, and see if you can fix it (there’s a challenge). Be aware also that they may not KNOW what they want, so it can be a tough job to find the right direction for a mix approach, and might take a couple of attempts, but don’t give up! listen to the rough mix, even if it’s bad, it can give a good overview of what the track is about, and also any problems (Can’t hear the vocals, too soft/hard EQ etc….)

8. Take Regular breaks

Ear fatigue is real, and just because you are young, you are not immune! Sometimes it’s hard – but even a 5-minute tea stop can do wonders for your perspective. And if you are the engineer – if you’re old enough to, please DON’T DRINK ALCOHOL while you work – it changes your perception (for the worse) and you will find yourself questioning things, as it dulls your high end.

9. Watch your levels

Start with the faders down if you can (like on a desk) and build a rough balance – if you have difficulty balancing things (can’t get it loud enough, or the fader is at the bottom, and it’s too loud or disappears) you may need to adjust your levels for better gain staging on each part – remember headroom in channels is GOOD – and the more level in each channel, the harder it will be to build a good mix before everything goes red, and in a DAW that’s mostly bad!

10. Reference other material

Reference other material, and level match it – this is very useful for seeing where you are with the tone (EQ) of the mix – and don’t forget to always print an “Unlimited” master pass, that is one without the limiter if you have cranked it hard – mix compression is ok, as long as you like it.
Have fun with it – and if you are working in a DAW (digital audio workstation) you can always come back fresh and go again!

About the Foundation for Musicians and Songwriters

The Foundation for Musicians and Songwriters is an IRS 501c3 Public Charity that is dedicated to helping Musicians and Songwriters develop their careers in the Music Industry.  We do so without taking a penny or rights from the artist we represent.

To Subscribe to our Music News Updates, Click Here

Click to Subscribe to our Newsletter

Chicago Clubs Fined for Back County Entertainment Taxes

Clubs across Chicago have suddenly found themselves in deep water as the Cook County Department of Revenue demands years worth of funds from unpaid amusement taxes.

According to an article from the Chicago Reader, the county code dictates that 3 percent of all ticket sales from venues with a capacity of 750 or fewer, unless the tickets are sold for “live theatrical, live musical, or other live cultural performances,” should be paid in taxes. Small-capacity club Beauty Bar has been asked to pay more than $200,000 in taxes going back at least six years, and President of Hospitality Business Association of Chicago Pat Doerr told the Chicago Reader he represents a half-dozen more clubs asked to pay similar prices.

Most of the businesses the county has so far demanded back-taxes from are venues that primarily book DJ and electronic acts. Beauty Bar owners and Doerr tell the Chicago Reader they thought these establishments were exempt from the amusement tax when the city of Chicago deemed DJ performances to be “live cultural performance” in 2006, but the county says that rule does not apply at its level.

A statement from Cook County Spokesman Frank Shuftan to Billboard Dance reads as follows:

The Cook County Department of Revenue is responsible for collecting the County’s home rule taxes. Among those are an amusement tax which imposes a tax upon the patrons of every amusement which takes place within the County that fails to meet certain exception criteria contained in the County’s ordinance.

The tax in question contains an exemption for live cultural, live musical or live theatrical performances taking place in a venue with a maximum capacity under 750 people. Venues that fail to meet these criteria or the definitions within the ordinance are subject to collecting the amusement tax from its patrons. Pursuant to the evidence currently in our possession, the County believes there is an outstanding tax liability. The Department of Revenue works with venues to address various questions and resolve outstanding tax liabilities.  In the event, the Department of Revenue is unable to resolve outstanding tax liability issues, those matters are then referred to the County’s Department of Administrative Hearings and after a hearing is conducted, the hearing officer will deliver a decision. 

We look forward to resolving this case in a fair and expeditious manner.

Beauty Bar responded to Billboard Dance as follows:

In May, 2015, our under 750 capacity venue Beauty Bar Chicago that provides some of the best live DJ experiences to our patrons on a weekly basis, received a fine from the Cook County Department of Revenue for $198,104.30 for Amusement Taxes owned since 2008.  We were surprised, to say the least, as we have operated under the commonly understood interpretation of the Amusement Tax ordinance, for both the County and the City, that venues under 750 capacity were exempt from this tax as long as they were collecting cover for “live musical or other live cultural performances”.  In 2006 the City of Chicago issued a Safe Harbor Ruling concluding that DJs were considered to be a live musical and cultural performance so long as they manipulated the music, and in general created a live experience.  Thus, as Beauty Bar only collects cover for nights during which we showcase professional DJs that meet all the criteria set forth by the City of Chicago, we’ve been comfortable operating under the assumption that we’ve been exempt from this tax.  Not once had we been questioned by the County about this tax until receiving the bill.

After we received the May 2015 citation, we merely thought the County was looking for us to articulate our position, which we did via phone and email.  We then received a letter asking for us to provide contracts for our DJs, and a signed statement explaining reasons why our venue was exempt.  We easily complied.  Last Fall and Winter they requested more information such as examples of our advertising/posters showing that our DJ’s were prominently displayed, and amounts paid to DJs during 2015 per month.  On February 23, 2016 we received a summons to court, after which we engaged an attorney to defend us.  We became aware that the County was targeting other DJ driven small venues, and thus we engaged with the Hospitality Association of Chicago to coordinate efforts.  During the proceedings this summer, we became alarmed to learn that the County officer Anita Richardson hearing the case made comments such as “Rock, Rap, and Grunge are not fine art, no matter how popular they may be…”, causing us concern that the County may be positioning to not only collect taxes on our DJ driven venues, but also on our small venues that showcase live bands such as The Empty Bottle that for 25 years now has been a staple in Chicago’s cultural fabric.

The great thing about Chicago is that it is ripe with small venues such as ours, and so it’s a shame that the County would attack the very venues that give life to the City’s culture, instead of working on ways to support and cultivate such enterprise.  As it is, we pay an exorbitant amount of tax, in one of the nation’s highest taxed cities.  We hope that eventually common sense will prevail, and that the County will come to realize they are attacking some of Chicago’s most important cultural contributions to the world.  Chicago invented the idea of a DJ being an artist, and spawned House music, one of the world’s most popular musical genres.  Last year the City of Chicago Department of Cultural Affairs presented a summer long showcase on House Music’s 30 year history.  Some of the world’s best known rappers come from Chicago.  If these proceedings continue on, and Beauty Bar is forced to continue expending legal bills to defend itself and the idea that rap, house, rock, and country are indeed ‘art’, it will become impossible for us to continue operating.  This amount of tax, both the back-tax they are seeking and having to pay this tax on an ongoing basis, would simply put us out of business.  Again, we hope this will not be the case, and that the County officials will not take the preposterous position that a government body ought to determine what is and what is not considered to be ‘art.’

About the Foundation for Musicians and Songwriters

The Foundation for Musicians and Songwriters is an IRS 501c3 Public Charity that is dedicated to helping Musicians and Songwriters develop their careers in the Music Industry.  We do so without taking a penny or rights from the artist we represent.

To Subscribe to our Music News Updates, Click Here

Click to Subscribe to our Newsletter

What Prince should have done with his Estate

Few artists are as determined to control the rights to their creative work as Prince was, making the fact that he apparently died without a will astonishing. An estate plan would have appointed his heirs and given clear directions about the use of his music and real estate, and avoided the uncertainty that now surrounds the management of his massive, multi-million-dollar estate. As the situation continues to unfold, music attorney Daniel K. Stuart outlines some basic steps that artists, songwriters and performers can take to protect their assets and would-be heirs from suffering a similar fate.

1. Hire a Good Trusts and Estates Lawyer — and a Good Music Attorney. They can work together to integrate entertainment assets into an estate plan. Neither will be cheap, but the money will be well spent. For larger estates, a tax attorney is also recommended.

2. Create a Last Will and Testament. This instrument appoints the executor of the estate, names childrens’ guardians and outlines how assets will be divided (to the extent that distribution is not otherwise governed by a living trust). Be sure to designate alternates in case the appointed trustee or executor dies, becomes incapacitated or declines to accept the role’s responsibilities.

3. Consider a Living Trust. This instrument provides for a trustee to hold the legal possession of assets to manage and ultimately distribute them. (A living trust may not be necessary for a married person without children who isn’t yet wealthy.) Also, explore using a “No Contest” clause in the Will or Living Trust. This device essentially disqualifies any heirs from receiving assets if they contest the Will or Living Trust and, where enforceable, can be an effective deterrent against a rogue heir interfering with a carefully constructed estate plan.

4. Create an Advanced Health Directive and a Durable Power of Attorney. The former document provides health care instructions in the event a person becomes incapacitated. (Otherwise, such instructions will be determined by relatives or by doctors.) The latter document appoints a trusted person to make health care and financial decisions in the event of the person’s incapacitation.

5. Manage Your Bank Accounts and Insurance Policies. Make sure that all beneficiary forms for retirement accounts and insurance policies are in order. Investment and bank accounts may require a “POD” (payable on death) or “TOD” (transfer on death) form to make sure heirs get access to money upon the account holder’s death.

6. Appraise Intellectual Property Assets. Catalogs of copyrighted compositions, sound recordings and celebrity name, likeness rights and other intellectual property can have considerable value so it is helpful to have that value appraised and updated from time to time.

7. Create an Information Outline. The trustee and/or executor will need to know where to find important documents as well as account numbers and contact information (and logins and passwords) for such items as insurance policies, bank accounts, investment accounts, safe deposit boxes, smartphones, tablets and computers. All of this information should be collected in one integrated document and held by the trusts and estates lawyer.

by Daniel K. Stuart is a partner with King, Holmes, Paterno & Soriano in Los Angeles. Published on Billboard Magazine’s website 8/8/2016.

About the Foundation for Musicians and Songwriters

The Foundation for Musicians and Songwriters is an IRS 501c3 Public Charity that is dedicated to helping Musicians and Songwriters develop their careers in the Music Industry.  We do so without taking a penny or rights from the artist we represent.

To Subscribe to our Music News Updates, Click Here

Click to Subscribe to our Newsletter

Kickstarter Has Helped Create 300,000 Jobs!

Is crowdfunding changing the world?  Apparently it is making a difference.  A new study from the University of Pennsylvania has found that crowdfunding site Kickstarter has created over 8,800 companies since launching, and with it 29,600 full-time jobs and 283,000 part-time ones. Professor Ethan Mollick examined 61,654 successful Kickstarter projects from 2009 thru 2015 and found that the site has generated $5.3 billion for creators and their communities.

“Successful crowdfunding projects have implications that go beyond the interactions of the backers and creators who participate in projects,” Mollick writes. “Crowdfunding campaigns lead to new organizations that ultimately generate billions in non-crowdfunding revenue and have hired thousands of employees.”

According to Mollick’s research, two- thirds of Kickstarter projects were created by individuals, with the rest coming from teams of mostly friends. A plurality of creators were between ages 25-34, though the average is 38, with 41 percent of the creators being female.

For musicians using Kickstarter, only 5 percent said that their projects helped “a lot” in securing a record deal, with 8 percent for publishing deals and 5 percent regarding distribution deals. That said, over 53 percent of respondents reported that their campaign helped “a lot” in owning the rights to their work, and 14.5 percent said it helped when going on tour.

“While it is not possible in this study to compare the e ciency of crowdfunding to other methods of encouraging entrepreneurship or subsidizing creative work, it is clear that, overall, the money raised from campaigns leads to positive returns across a variety of measures,” Mollick concluded.

About the Foundation for Musicians and Songwriters

The Foundation for Musicians and Songwriters is an IRS 501c3 Public Charity that is dedicated to helping Musicians and Songwriters develop their careers in the Music Industry.  We do so without taking a penny or rights from the artist we represent.

To Subscribe to our Music News Updates, Click Here

Click to Subscribe to our Newsletter

« Older posts